

Spotlight
How to Use IPv6 With AWS Services That Don't Support It
Build an IPv6-to-IPv4 proxy using CloudFront to enable connectivity with IPv4-only AWS services.


As more and more private and public APIs become available, we find ourselves consuming these APIs for a myriad of reasons. Of course, we want those to be as fast as possible, to reduce our compute costs and get our data collection completed more quickly. So why not test performance using an asynchronous library vs. the built-in standard multithreading and multiprocessing capabilities of Python? And while we are at it, let's make this test quick to iterate and deploy using another tool provided by AWS called Chalice.
Concurrent is a module that has been included in the standard libs of Python since version 3.2; Primarily used for parallel programming, it also has some more interesting use cases for day-to-day projects. When you need to process a bunch of data for different calculations it is quite invaluable. But is concurrent going to help with fetching API calls? After all, the majority of the time is spent waiting on the remote server's response not crunching the resulting data.
So how did the tests turn out? Well, the setup for using the concurrent library was simple to run. While preemptive multitasking is supported, true multiprocessing functions are not supported in Lambda yet. The results of running the standard requests module versus using preemptive multitasking the requests module were disappointing. A deeper look was needed and the source of the disappointment is due to the fact that we were waiting for APIs to return information not lacking processing capacity or speed.
So how to proceed? There must be a faster way to process multiple API requests than a standard for loop. Utilizing the requests_futures library for async requests of the APIs was a factor of 3.5-4x faster than the preemptive multitasking of the requests module. Primarily this method directly addresses the “wait” issue in a similar way that promises do in JavaScript. Let's dive deeper into async and the requests_futures module.
Proof, as they say, is in the pudding, but in our case, it will be at the speed in which we can gather some information from several public and freely available APIs. For simplicity and to allow the majority of folks to try this experiment themselves without a lot of account and API token creation, I have selected a simple public, free, and tokenless API(s) to use for the exploration.
What are we gathering?
http://universities.hipolabs.com/search?country=COUNTRYAs a Pythonista I am a huge fan of Chalice (https://aws.github.io/chalice/) as it provides a simple way to create Python-based AWS Lambda APIs. Let’s take a quick look at Chalice then code our gathering of the API data. Looking at the quickstart for Chalice you will see that it is simply a matter of installing Chalice using pip or an equivalent python package manager and that the Chalice commands are available using chalice --help. NOTE: You will need to have configured your AWS credentials and config file prior to being able to deploy your code.
Step One: Create the Chalice project and enter the project directory
chalice new-project restcollector
cd restcollector
You will also have to add 2 entries (one on a line) to the requirements.txt file so Chalice knows to pull down these libraries so we can use them in our code.
requirements.txt

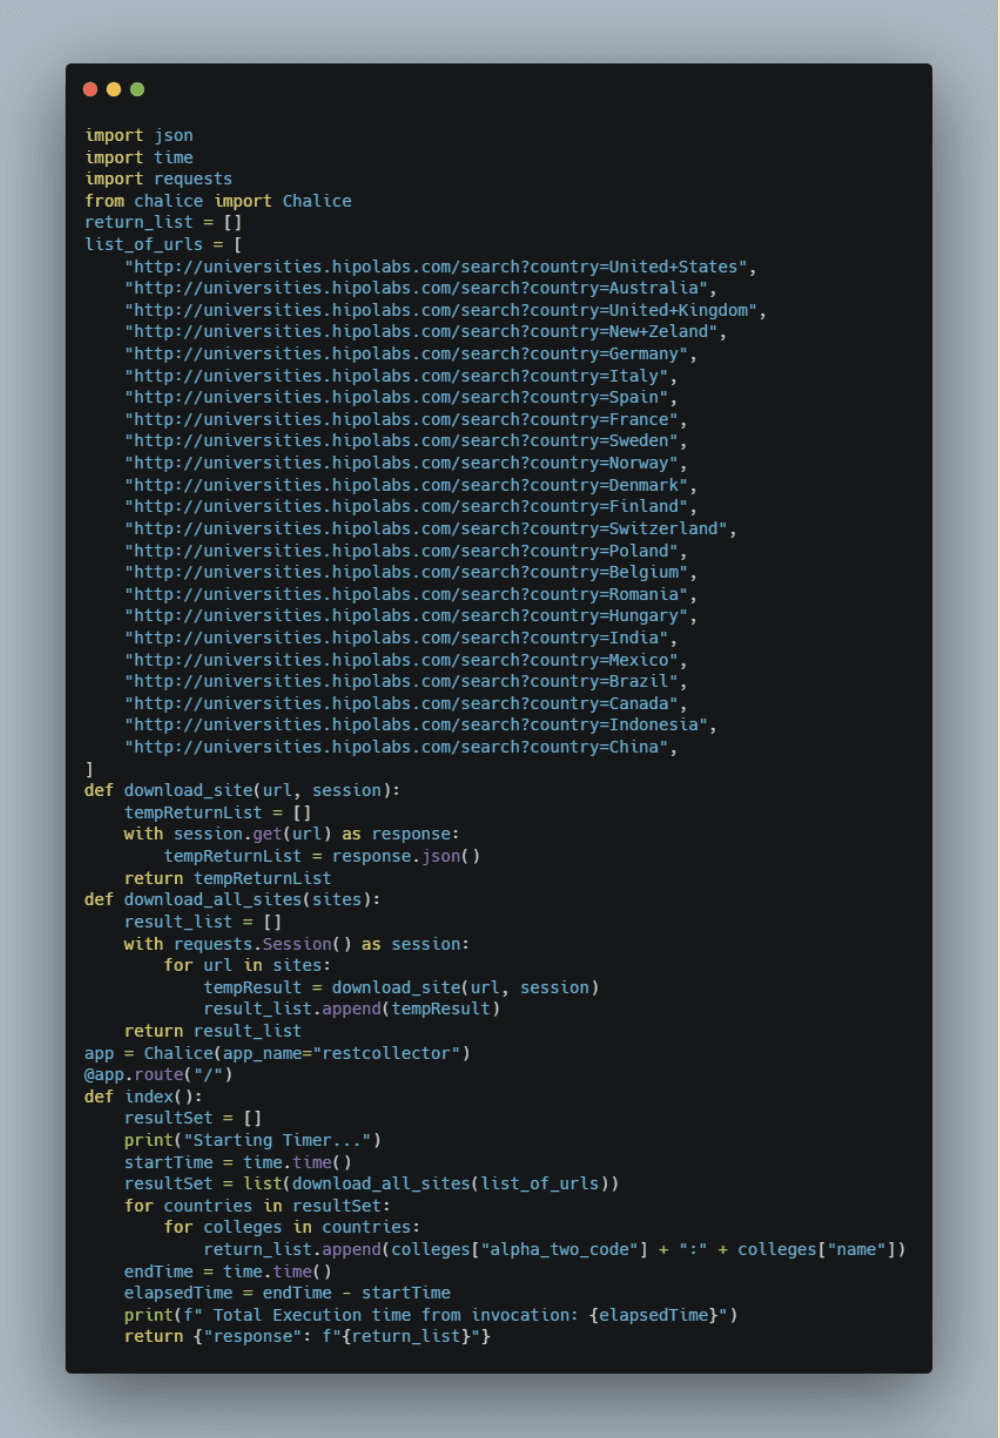
Step Two: Edit the app.py with your favorite editor to add our initial non-async attempt as seen in the screenshot below (my inline comments were removed to keep the screenshot smaller).
Step Three: Chalice has a wonderful feature that lets us test locally; you can invoke this with:
chalice local
Then access your function with a browser http://localhost:8000
Your results should look something like this (I put the time in bold), times will vary based on your machine's performance and your internet connection, that’s ok we are just checking for the correct code at this point.
Restarting local dev server.
Starting Timer...
Serving on http://127.0.0.1:8000
Total Execution time from invocation: 1.2187955
127.0.0.1 - - [03/Oct/2022 15:15:47] "GET / HTTP/1.1" 200 -
127.0.0.1 - - [03/Oct/2022 15:15:52] "GET /favicon.ico HTTP/1.1" 403 -
Step Three: Deploy your code by pressing Ctrl-C to quit the local execution (may take a moment to clean itself up so don’t be impatient) then executing the chalice deploy command, and as long as your AWS credentials are setup properly you will get a response that looks like the one below with a URL for you to test your new Lambda (I have removed one piece of data in the ARN and replaced with an X.
chalice deploy
Creating deployment package.
Creating IAM role: restcollector-dev
Creating lambda function: restcollector-dev
Creating Rest API
Resources deployed:
- Lambda ARN: arn:aws:lambda:us-east-1:X:function:restcollector-dev
- Rest API URL: https://mdukptzumj.execute-api.us-east-1.amazonaws.com/api/
Step Four: Let’s go see how long it took by looking at the Amazon CloudWatch log group that Chalice created for us as part of the deployment. Open a browser and log in to your AWS console, type “CloudWatch” in the Search for Services, features, blogs, docs, and more area in the top menu, and press return.
Select Log Groups from the left navigation menu and click on the Log Group that was created by Chalice (should be the same name you gave the project, restcollector in my case). You will see one or more Log Streams depending on how many times you refreshed or opened the URL to get results. Click the one with the most recent Last event time. You will see something like the screenshot below, I executed the code twice to avoid cold start and requirements pull becoming a factor in the execution time comparison:
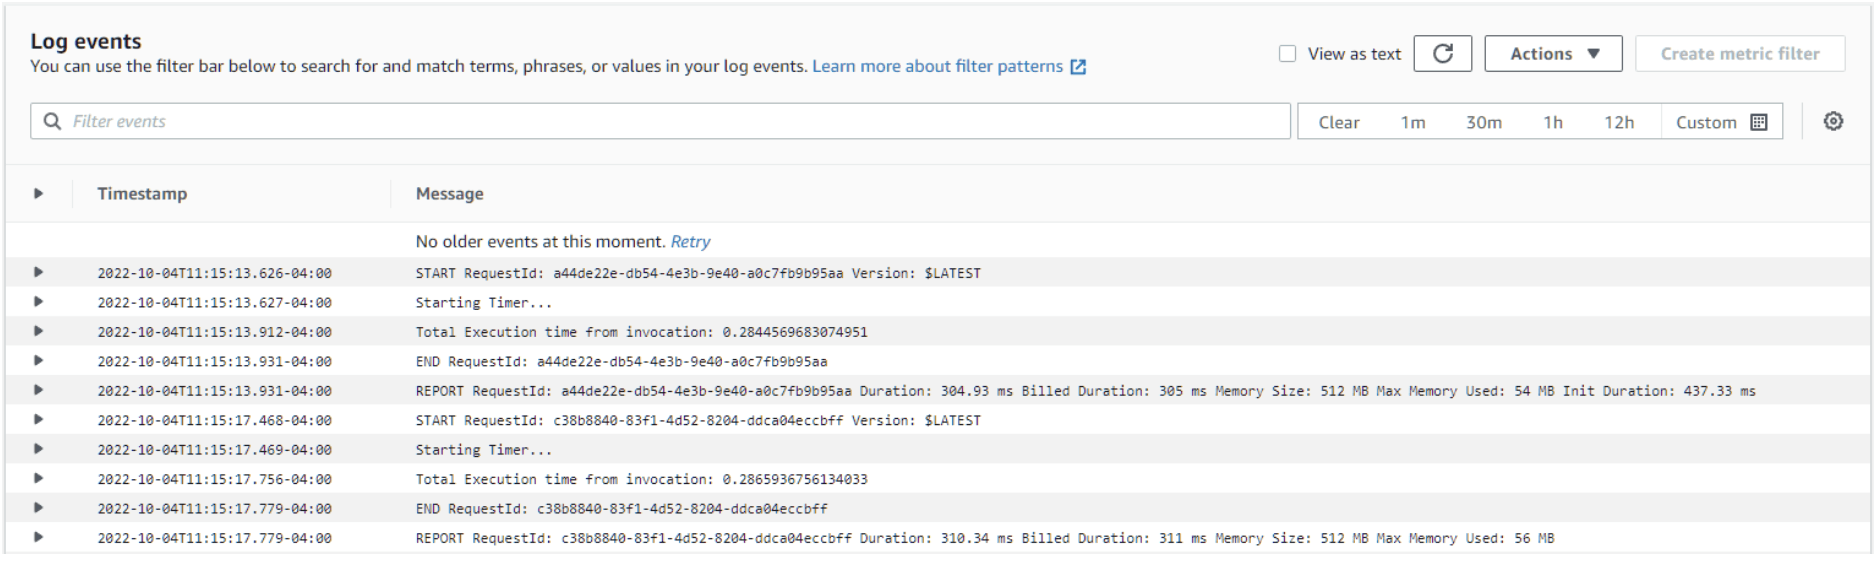
Notice the Starting Timer from our print statement in the code and the best Total Execution time is noted there, make a note of it, in this case, it was .2844569683074951
Great, now we have a working Lambda function powered by the Amazon API Gateway that we deployed with one command (chalice deploy). Now let's refactor our code to use the requests_futures module I mentioned earlier.
Step One: Make a copy of your original file as a reference. In whatever code editor or in the command line, just copy the file to app.py.bak
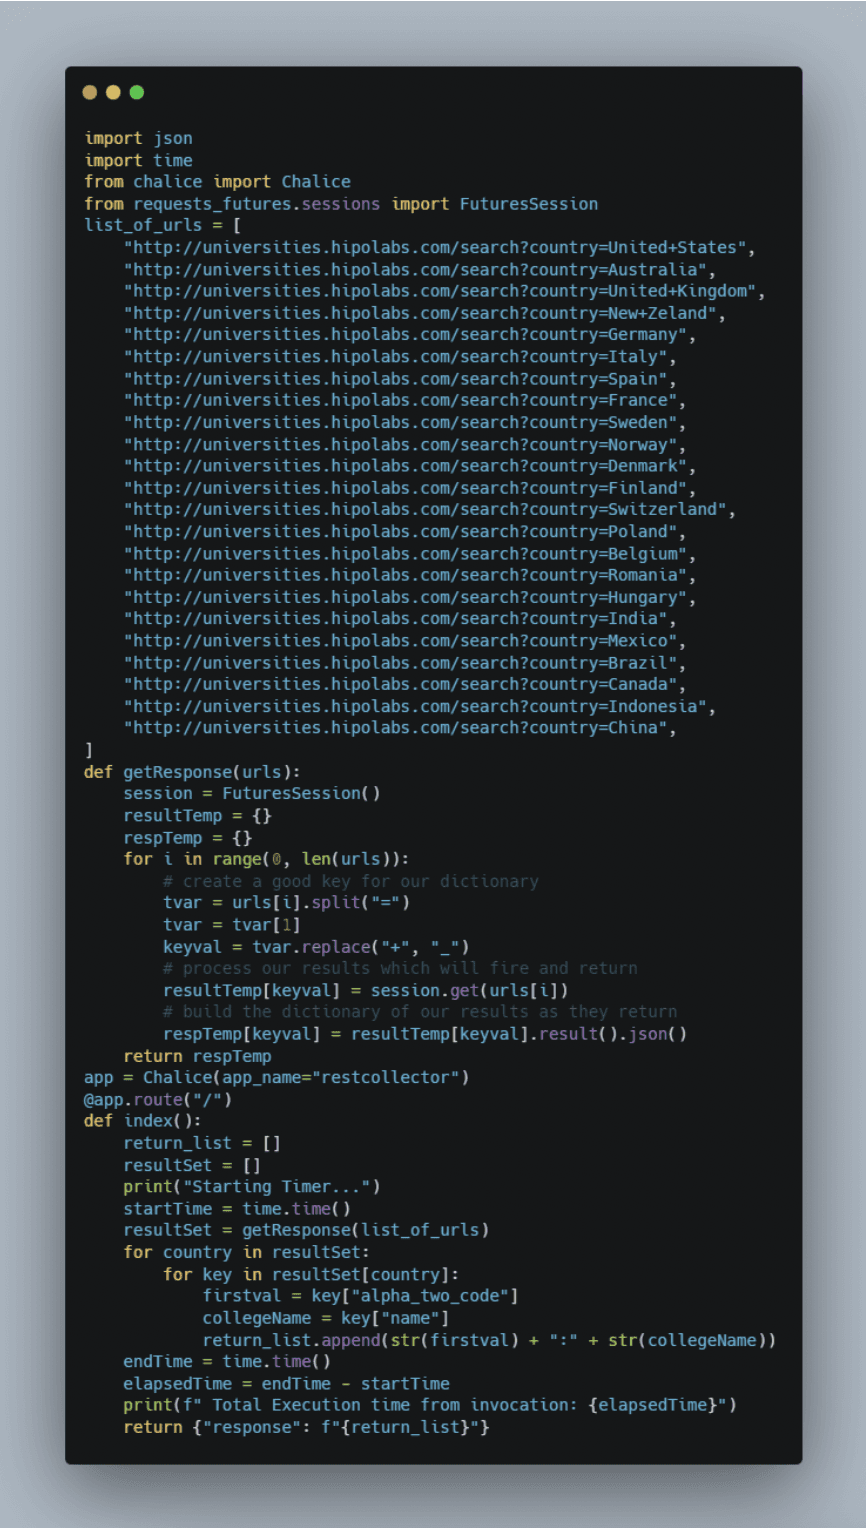
Step Two: Enter the code seen below to utilize the requests_futures module. Notice its very similar code with a few simple additions to handle the request, and return response. Run chalice local and test the code to make sure it’s all debugged and ready to go. (my inline comments were removed to keep the screenshot smaller).
Step Three: Deploy your code by pressing Ctrl-C to quit the local execution of Chalice (may take a moment to clean itself up so don’t be impatient) then executing the deployment command, and as long as your AWS credentials are setup correctly you will get a response that looks like the one below with a URL for you to test your new Lambda (I have removed one piece of data in the ARN and replaced with an X.)
chalice deploy
Creating deployment package.
Creating IAM role: restcollector-dev
Creating lambda function: restcollector-dev
Creating Rest API
Resources deployed:
- Lambda ARN: arn:aws:lambda:us-east-1:X:function:restcollector-dev
- Rest API URL: https://2jg5vrlky8.execute-api.us-east-1.amazonaws.com/api/
NOTE: The URL is different than the previous iteration
Step Four: Let’s go see how long it took by looking at the Amazon CloudWatch log group that Chalice created for us as part of the deployment. Open a browser and log in to your AWS console, type CloudWatch in the Search for Services, features, blogs, docs, and more area in the top menu, and press return.
Select Log Groups from the left navigation menu and click on the Log Group that was created by Chalice (should be the same name you gave the project, restcollector in my case). You will see one or more Log Streams depending on how many times you refreshed or opened the URL to get results. Click the one with the most recent Last event time. You will see something like this:
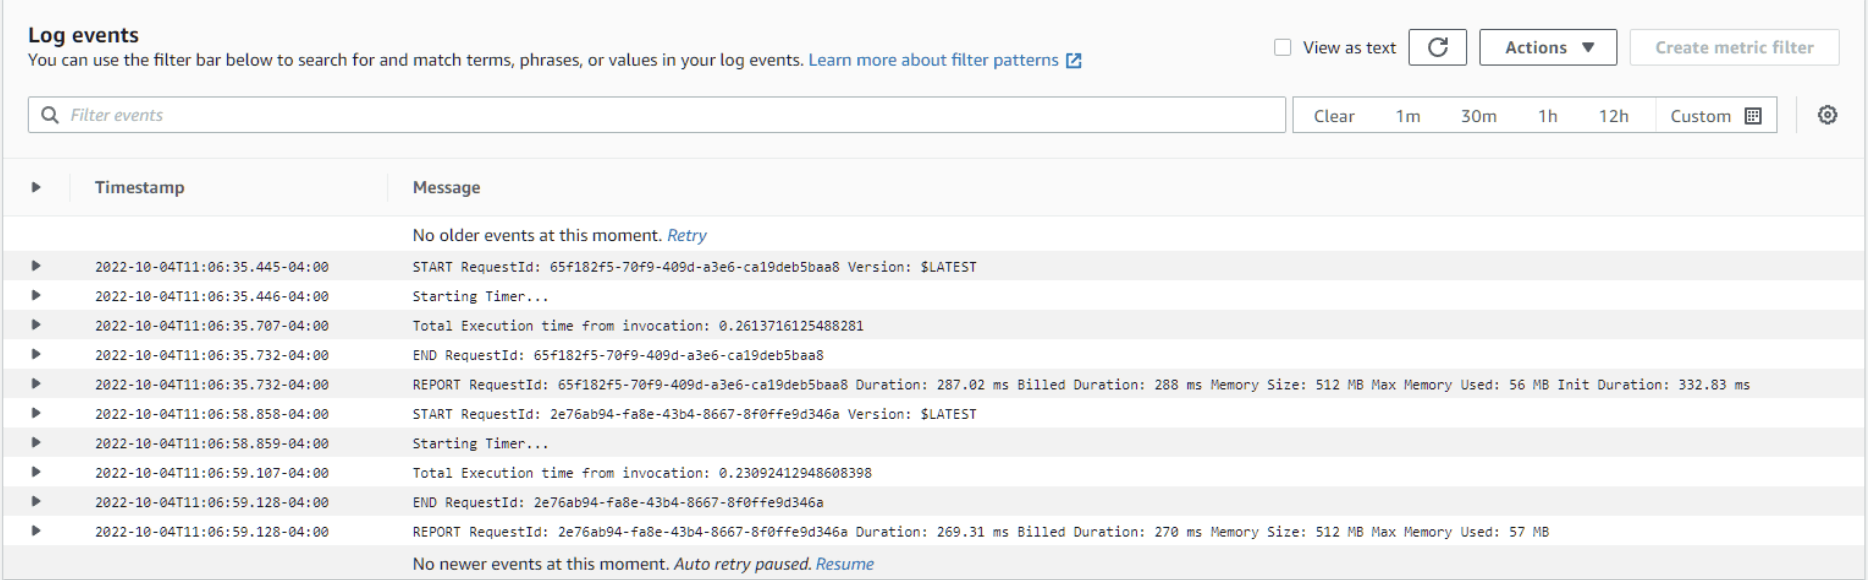
Notice the Starting Timer from our print statement in the code and the Total Execution time is logged there, make a note of it, in this case, it was .2309241294860398 [ 19.4% Faster ]
Great, now we have a working AWS Lambda function powered by the Amazon API Gateway that we deployed with one command (chalice deploy). And it's 19.4% faster without tweaking anything. Some memory adjustments to the Lambda to give the preemption a little more working room could further improve performance, feel free to make the adjustments in the console under Lambda > Configuration (I ran mine with 512MB of memory). When you are done it’s time to clean up and make sure we don’t leave anything behind, never the fun part right?
Step One: Run chalice delete and Chalice will do all the heavy lifting. Removing the Lambda, API Gateway, Cloudwatch Log group, etc. That wasn’t so bad now was it, and yep you are all done.
To recap, we have created sets of code, one traditional and one using preemptive multitasking, and were able to test and deploy and remove them with four simple commands.
chalice init chalice local chalice deploy chalice delete
Leveraging async libraries is just one of the ways you can get more bang for your AWS Lambda buck by better utilizing the programming language's natural tools to improve performance, sometimes dramatically. Coupled with the ease of Chalice to test, iterate, deploy and redeploy your code in moments, it’s quite a powerful set of tools allowing you to query approx. 5k records from a dozen or more websites and aggregate the data with about 70 lines of code. Hope you enjoyed this little introduction to Chalice and Python’s requests_futures and concurrent libraries. For more information on these libraries you can access the official documentation here:
Concurrent Execution — Python 3.9.14 documentation
ross/requests-futures: Asynchronous Python HTTP Requests for Humans using Futures (github.com)
Visit the Github repo to access the code referenced in this article.

Build an IPv6-to-IPv4 proxy using CloudFront to enable connectivity with IPv4-only AWS services.


