

Cloud Native
Using AWS XRay for ECS Observability
Learn how AWS X-Ray is a vital tool for enhancing the observability of containerized applications on ECS.


Kubernetes is more simple than you think. This post is a high-level discussion of how to get to Kubernetes, what to do when you get there and how to automate the Kubernetes frankenstein you’ve just created.
Note: if you are completely new to Kubernetes, I urge you to read the illustrated guide to Kubernetes for children, it’s an excellent introduction.
The key technologies are all familiar names. This post is for all levels, so here are some definitions which the experts can skip over:
The process that this post follows is something like this:

Assessing the app is a crucial first step. Diving into building images without first assessing the effort, dependencies, and environment variables is a dangerous and possibly time-expensive approach. Every app is different. The languages and tools also determine the effort required e.g., java vs. node vs. rails apps. Tools required could be Maven, NPM, etc.
Other questions you may want to ask: how is the app compiled? How do the services talk to each other? What is the health of this app? and what are the dependencies? Another consideration is whether the app will be a giant monolith or a set of discrete services neatly interwoven with one another.
The best-case scenario here is a clear README and clear direction on connection to external services. Ideally the app has been designed and deployed using the 12factor methodology. This is probably the case for 10-20% of all apps in production.
Once you’ve completed the assessment of the app, the next step is to estimate the work effort. The work effort is going to vary depending on your app. From my experience of overseeing these projects, the project runs something like this:
To break it down further, the artifacts for a java app are made up of JAR files. These are individual executable binaries that make up all or part of the app. Tools of choice here are Maven or Ant, you can take your pick on which one you’d prefer but I believe Maven is more popular. The app itself is run in a container or on a VM. This container or VM is then exposed to the web server. The web server or front end is most likely compiled with javascript and the backend or ‘worker’ container is the back-end logic and written in Java. The JDK is required for testing.
Once tested and the container runs smoothly (which will take a few attempts), then the working image of the app code is packaged using Docker. The packaged code can be called an image, and a running instance of that image is a container. Depending on your experience you may refer to this process as dockerization or containerization.
Once a functioning version of the app code is ready as a docker image, it’s time to package the code into a container. The next step is to decide how the container should be exposed. This is exposed either directly, through a web layer or through a web container..
The web server has all the fancy static assets that make up the front-end of our app. This web server/container would make calls to the container with the app code; since this container would be doing the ‘work’, it is called the ‘worker’ container.
The best place to store these images is in a repo locally or on a container registry. A good one to use is the AWS Elastic Container Registry (ECR).
A very simple app can be run in one container. Docker Run could manage a simple app. For a more complicated app you could use Docker Compose. Docker Compose works for multiple containers on a single server and exposes network layers for inter-container communication. Docker Compose is orchestrated with defined YAML files. When running Compose, you decide which nodes you want to run it on, the network and storage layers are also configured for a fraction of the complexity of Kubernetes. These two solutions will work for smaller and simple deployments.
There are so many services out there for more complex deployments. You can also use Docker Swarm via the Docker Engine CLI to orchestrate multiple containers in a cluster. For significant deployments, Kubernetes has more functionality and many more configurations. For this use case, we will continue down the path of using Kubernetes.
Kubernetes is the optimal solution for folks who:
Let’s take a minute to review the advantages of Kubernetes. One of the key advantages of Kubernetes is the so-called ‘brain’ of the cluster, also known as the control plane. Using the control plane means that resources can be exposed uniformly across all clusters. Other advantages include declarative deployments that describe in detail how the deployment looks, how should be provisioned, the resource requirements and the communication methods. There is also a scope for automation in a lot of different places. Not to mention, the Kubernetes community is large and growing with a strong base of documentation.
There are disadvantages too. The first one is complexity. The use of Kubernetes is often too complicated. There is room for massive amounts of customization which is powerful but requires a workforce to develop and a workforce to maintain.
An example of when you might need to use Kubernetes is when you have complex architecture referencing DBs or stores that are not in your environment. Kubernetes is better for this kind of set-up.

A sample Kubernetes Architecture in AWS that is Highly available and uses multiple namespaces in a VPC.
Kubernetes is going to orchestrate the container images we’ve created. We have two options to get started here: building from scratch or setting up a managed cluster.
Building a cluster from scratch is time-consuming and complex. It requires partitioning servers and nodes, building out components, and determining connections back to the brain of the cluster, also called the control plane. Dormant nodes are built running the Docker daemon. Kubernetes tells the docker daemon to run things.
Setting up a managed cluster is recommended. AWS has an Elastic Kubernetes Service (EKS), which offers pre-defined clusters. EKS can take over a portion of your cluster management, including managing the control plane, "and automatically synchronizes your nodes with the control plane. AWS just cut their price to run an EKS cluster by 50% in January.
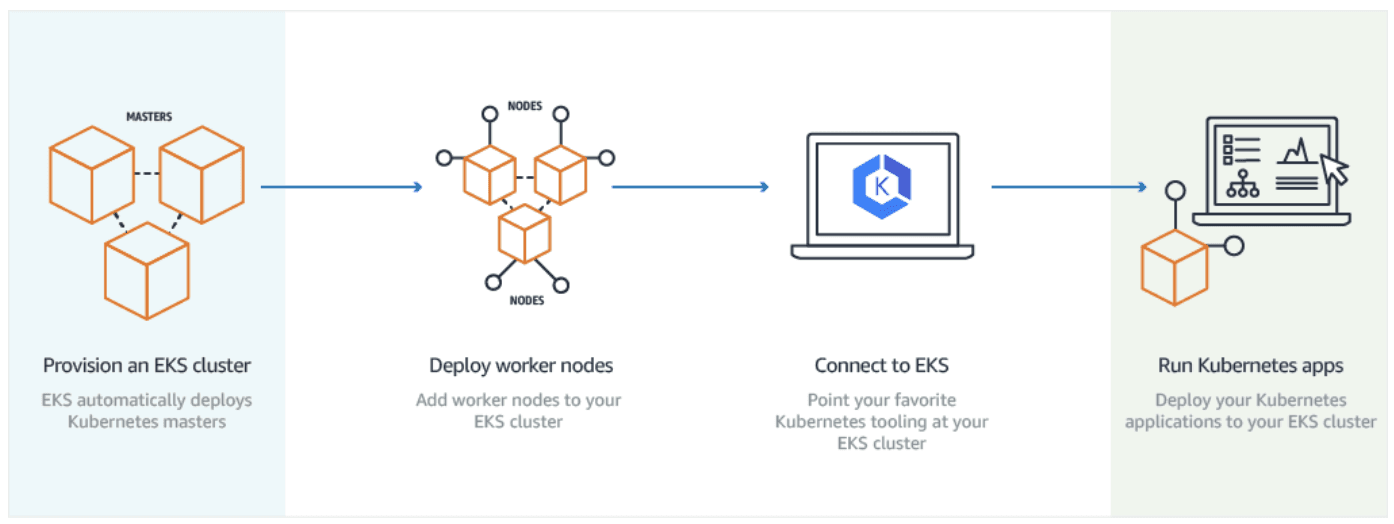
An overview of the process getting set-up on EKS.
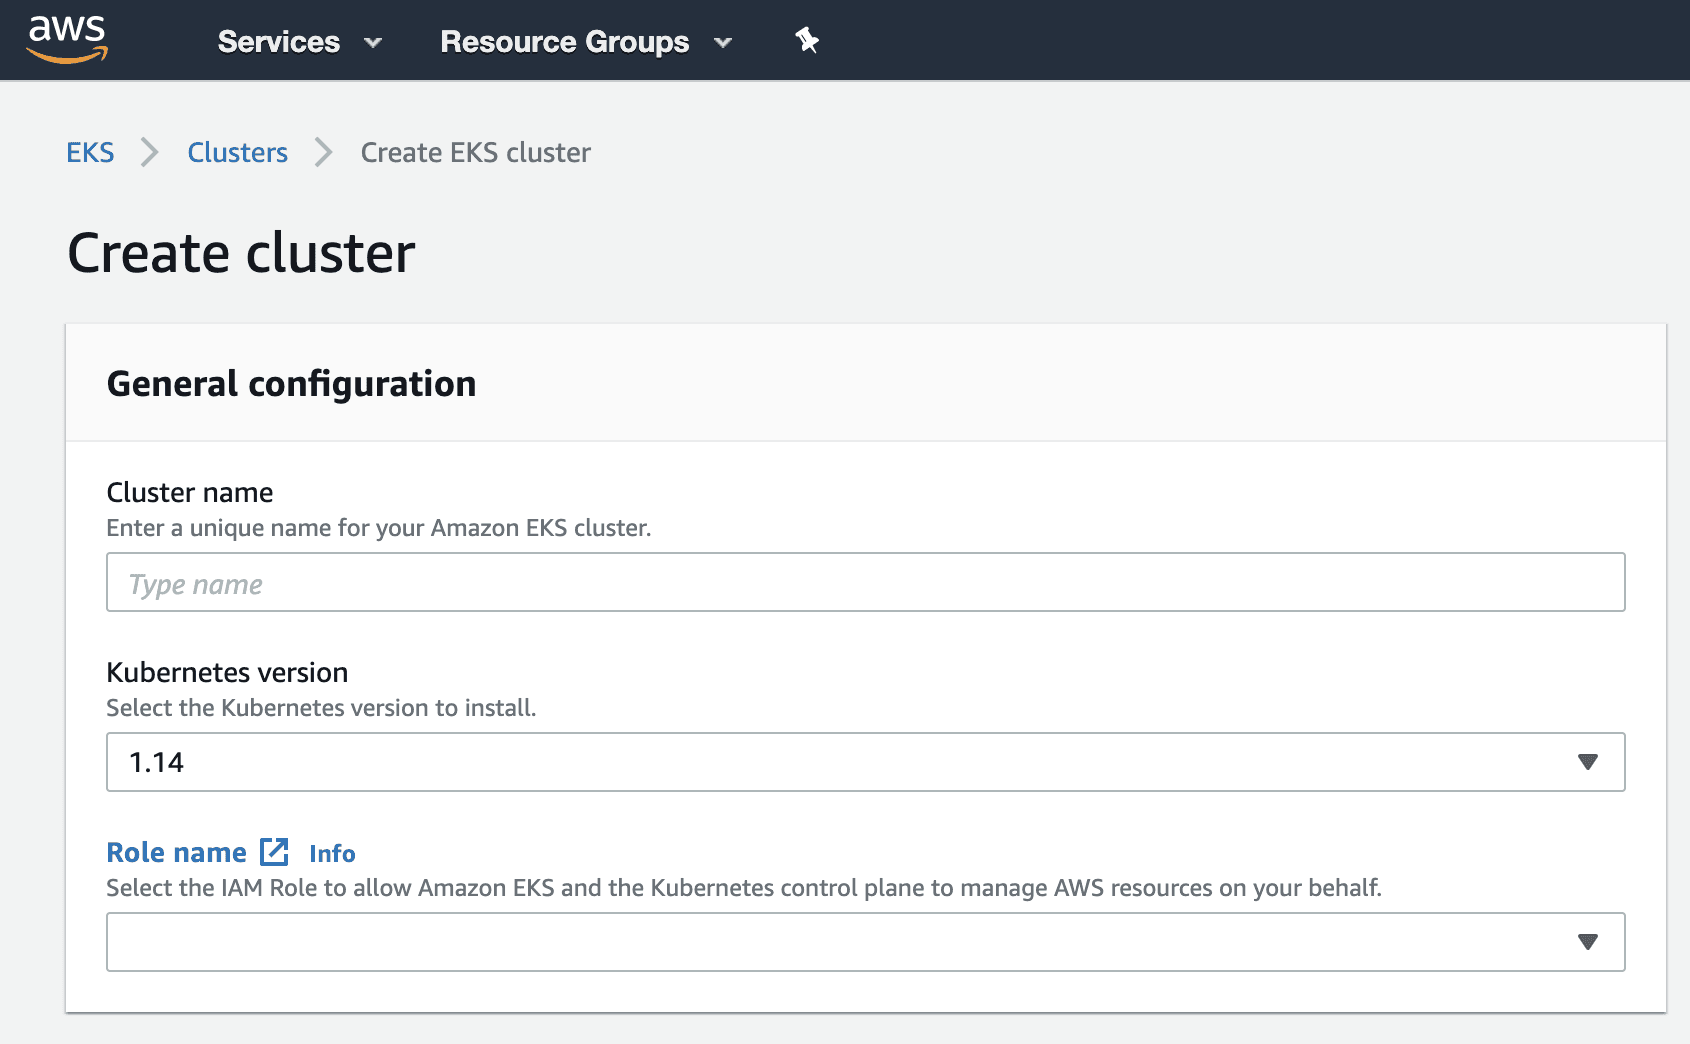
Setting up a cluster in the console
One of the other niches with EKS is that you have to use the EKS command line tool eksctl. Since EKS serves the Kubernetes API, this is used to create your cluster from the command line with ease.

When deploying the cluster, Kubernetes tells the nodes ‘run on this network with these resources. After Kubernetes takes in a deployment object, the server selects a node to run an image and provisions the resources before running the docker containers. Kubernetes also has load balancing built-in, if configured correctly, that balances loads when spikes in usage occur.
Once the cluster is defined the images need to be linked or referenced. If the images are in AWS ECR, then the URL can be referenced. The next step is to deploy the cluster.
Once deployed, EKS provides credentials, which are used with eksctl/kubectl for communicating with the Kubernetes API. Kubectl is used to tell Kubernetes to build out your cluster, feeding it files using a declarative configuration called a Kubernetes manifest. If you decide to use helm, then these files are orchestrated into templates via helm charts.
Automation is also configurable for updates in Kubernetes. When automating Kubernetes image pulls, the image automatically deploys to Kubernetes. The automatic image pulls spin up new containers if there is new code. The new docker container is a function of the Kubernetes implemented.
Setting up physical or cluster level monitoring in Kubernetes can be straightforward. The Kubernetes community and available documentation are gigantic.
Kubernetes integrates with everything, on-prem and in the cloud. Much functionality is built out of the box, and the monitoring piece is much less taxing when determined ahead of time.
With limited customization, it’s possible to put in place cluster-wide monitoring and drill into every component of how it works and what it does. There are very good out of the box solutions.

Helm charts parameterize the Kubernetes cluster. Helm charts achieve the parameterization through templating the Kubernetes manifest files with variables.
The use of variables makes it easier for QA and Dev teams to test using Kubernetes namespaces. The value for the variable is in a values file in YAML. These files can be used for a separate environment, e.g., AWS, on-prem, or vSphere. In the example of creating a deployment in a new environment, the helm CLI tool creates the new deployment, feeds in the values file, and builds updated templates with those values. Once this happens, the templates become Kubernetes manifest files, running kubectl under the hood.
Automation within Helm uses Tiller. Helm wraps Kubernetes in Chef and can run with Ansible. If the update is being automated, Tiller is the agent that is deployed on the cluster. Tiller manages the version and creates a replica set, using auto-scaling pods across the cluster. The YAML file and service file can be done manually before being packaged by Helm into a similar folder structure. Helm deployments can then manage rollbacks using the rollback command. The helm chart can be automated to pull in the latest image from the docker image repo. The automated pull happens by specifying the ‘latest’ image.
The Helm chart is a collection of files inside a directory. Here’s an example of how it might work for a /wordpress directory. Per the official helm documentation, this is the expected structure:

To create a chart, you must create the Chart.yaml file. The fields below are examples of what is expected in that file, other fields are ignored.

This should be used as a high-level guide for putting your app into Docker containers, orchestrating via Kubernetes and automating with Helm charts.

Learn how AWS X-Ray is a vital tool for enhancing the observability of containerized applications on ECS.


