Spotlight
How to Use IPv6 With AWS Services That Don't Support It
Build an IPv6-to-IPv4 proxy using CloudFront to enable connectivity with IPv4-only AWS services.


Hello, again! Welcome back to the third post in my Kubernetes deployment series.
The links to all three posts in this series are.
Real-World Kubernetes Deployments Part 1 - Cloud Native CI/CD
Real-World Kubernetes Deployments Part 2 - Cloud Native CI/CD
Real-World Kubernetes Deployments Part 3 - Cloud Native CI/CD
In my previous two posts we investigated various Kubernetes manifest directives that help manage containers throughout the pod lifecycle and highlighted a container image that simulates the issues these directives were designed to help mitigate. In more general terms, we looked at the self-healing functionality afforded to deployments by Kubernetes and then conducted experiments to witness how it gets applied in real time.
In this post, we’re going to look at how to construct an AWS cloud-native CI/CD pipeline to facilitate Kubernetes deployments to an Amazon Elastic Kubernetes Service (EKS) cluster. This will involve the following:
For reference, the container image and Kubernetes deployments were constructed from resources created in my first and second posts in this series.
You can find all of the resources used in this blog post at the following git repository.
https://github.com/trek10inc/real-world-kubernetes-deployments-cloud-native-cicd-part-3
Prior to the construction of our pipeline, we’ll apply the Kubernetes deployment and supporting resource manifests to the EKS cluster. This will provide us with the following Kubernetes objects that we’ll look to update with a CI/CD pipeline:
This is accomplished via the following “kubectl” invocations. The directories we are pointing the kubectl command at are found in the “codecommit-repo” directory from the git repository associated with this blog post.
$ kubectl apply -f non-deployment-manifests/
namespace/trek10 created
service/example-foo-svc created

$ kubectl apply -f deployment-manifests/
deployment.apps/example-foo created
Once created, you can observe the objects via the following.
$ kubectl get ns
NAME              STATUS   AGE
default           Active   2d5h
kube-node-lease   Active   2d5h
kube-public       Active   2d5h
kube-system       Active   2d5h
trek10            Active   96s

$ kubectl get all -n trek10                                  NAME                               READY   STATUS    RESTARTS   AGE
pod/example-foo-79fc64f66c-7vxf6   1/1     Running   0          8m24s
pod/example-foo-79fc64f66c-8t6fj   1/1     Running   0          8m24s
pod/example-foo-79fc64f66c-n5qqp   1/1     Running   1          8m24s

NAME                       TYPE       CLUSTER-IP      EXTERNAL-IP   PORT(S)        AGE
service/example-foo-svc   NodePort   10.100.198.18   <none>        80:30080/TCP   8m44s

NAME                          READY   UP-TO-DATE   AVAILABLE   AGE
deployment.apps/example-foo   3/3     3            3           8m27s

NAME                                     DESIRED   CURRENT   READY   AGE
replicaset.apps/example-foo-79fc64f66c   3         3         3       8m28s
Note the version number being handed to the application container via the “CONTENT” environment variable within the deployment manifest. This is initially set to “1.0.0” and is part of what is returned in the response to requests made to the apex route of the application. We’ll increment this in subsequent application updates to verify our pipeline is working.
- name: CONTENT
  value: '{ "team": "foo", "version": "1.0.0" }'
We’ll verify this by making a request to the application using an ephemeral “alpine” container. As I was not working from a bastion with access to the pod network, I first needed to obtain the internal IP addresses of the worker nodes. If using a bastion with access to your pod network, you can simply use the cluster IP address handed to the service by Kubernetes or a worker node’s IP address.
The following kubectl invocation will provide you with the internal IP addresses of each worker node.
$ kubectl get nodes -o jsonpath='{range .items[*]}{.status.addresses[?(@.type=="InternalIP")].address}{"\n"}'
10.1.51.164
10.1.67.192
10.1.87.93
Using one of these addresses, we’ll make a request to the application via a temporary pod.
$ kubectl run test --rm -it --restart=Never --image=alpine/curl -- /bin/sh -c 'curl http://10.1.51.164:30080'
{ "team": "foo", "version": "1.0.0" }
Now that we’re up and running we can begin building our CI/CD pipeline. We’ll start by creating a CodeCommit repository in the same region as the EKS cluster and pushing the contents of the “codecommit-repo” directory from the git repository associated with this blog post.
Open the following URL and create a CodeCommit repository. Make sure to set the “region” subdomain and query string parameter to the appropriate region.
https://us-west-2.console.aws.amazon.com/codesuite/codecommit/repository/create?region=us-west-2
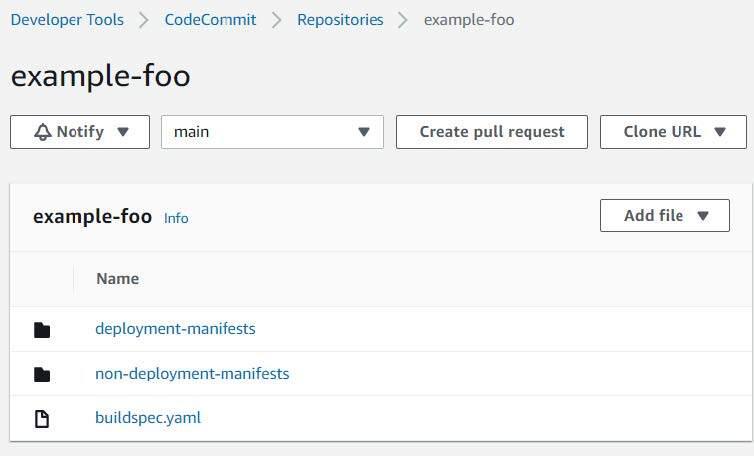
Your repository should look something like the following after making your initial commit and push.
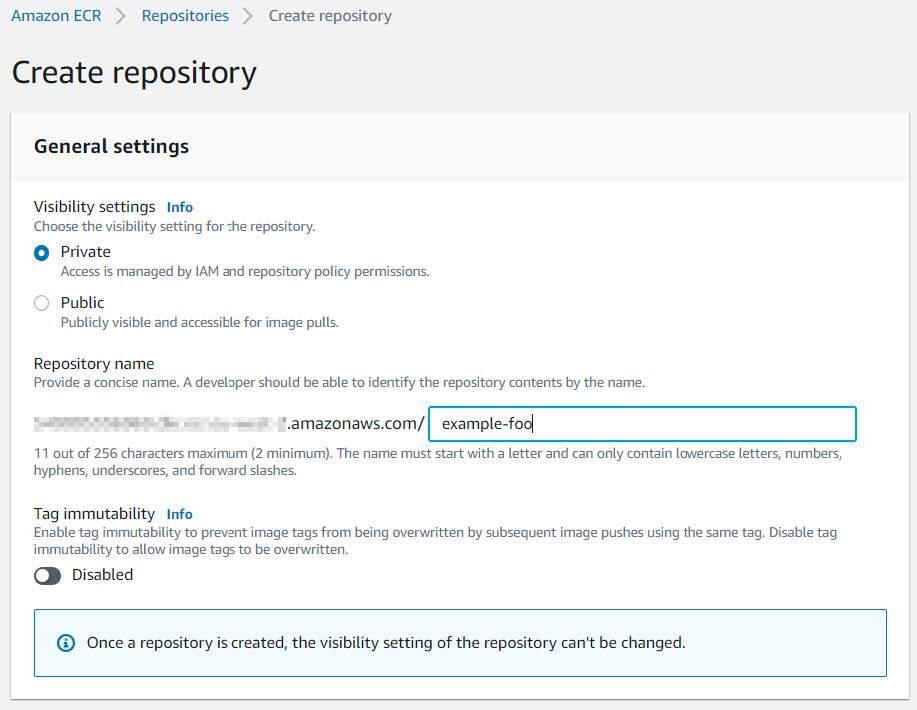
We’ll also need to create a private Elastic Container Registry (ECR) repository and populate it with the build container we’ll use to deploy our Kubernetes manifests. Select a name for your repository and leave the remaining defaults selected.
Open the following URL and create an ECR repository. Make sure to set the “region” subdomain and query string parameter to the appropriate region.
https://us-west-2.console.aws.amazon.com/ecr/create-repository?region=us-west-2
With a repository created, we’ll need to build and push our container image to it. From the “build-container” directory of the git repository associated with this blog post, and with a valid set of AWS credentials, we’ll use the following commands for the container build and subsequent repository push.
IMAGE_NAME="example-foo"
TAG="latest"
REPO_NAME="example-foo"
docker build -t ${IMAGE_NAME}:${TAG} .
REPO_URL=$(aws ecr describe-repositories --repository-names ${REPO_NAME} | jq -rM '.repositories[].repositoryUri')
docker login -u AWS -p $(aws ecr get-login-password --region ${AWS_REGION}) ${REPO_URL}
docker tag ${IMAGE_NAME}:${TAG} ${REPO_URL}:${TAG}
docker push ${REPO_URL}:${TAG}
With a repository created and the build image pushed, we can begin building our CodePipeline pipeline. Open the following URL to begin the creation of a CodePipeline pipeline. Make sure to set the “region” subdomain and query string parameter to the appropriate region.
https://us-west-2.console.aws.amazon.com/codesuite/codepipeline/pipeline/new?region=us-west-2
Choose a name for your pipeline and accept the default settings.

Click “Next” to progress to the “Add source stage” step of the workflow, choose “AWS CodeCommit” for the source provider, and select the appropriate repository name and branch name from your CodeCommit repository. Leave the remaining defaults selected.

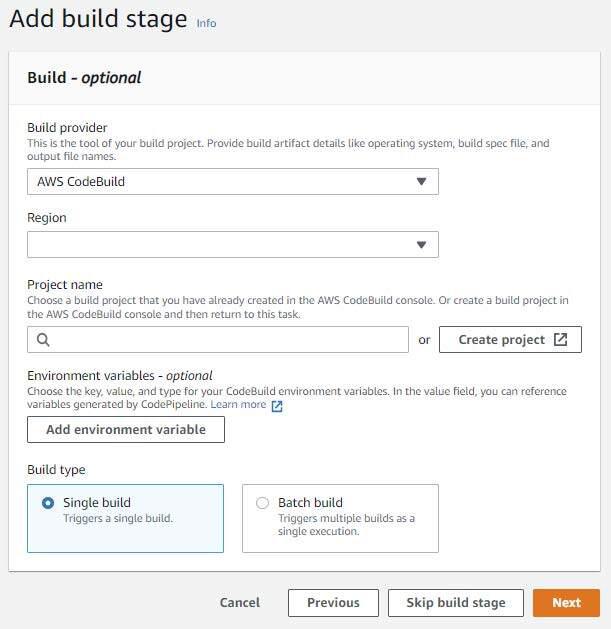
Click “Next” to progress to the “Add build stage” step of the workflow, choose “AWS CodeBuild” as the build provider, make sure your region is set appropriately, and then create a CodeBuild project by clicking the “Create Project” button.
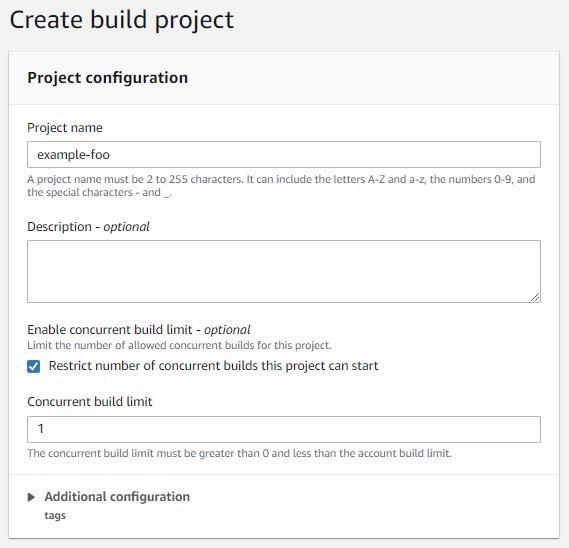
Give the project a name, select “Restrict number of concurrent builds this project can start”, and set the concurrency to 1.
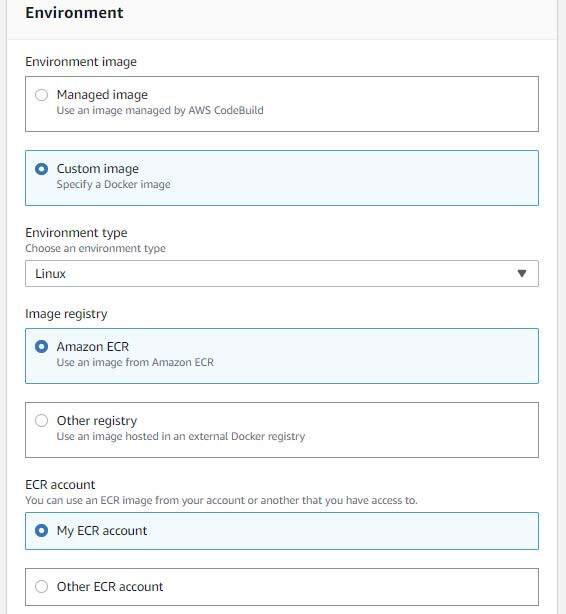
Select “Custom image” for the environment image and “Linux” for the environment type. Make sure “Amazon ECR” and “My ECR account” are selected for the image registry and ECR account (respectively).
Choose your ECR repository and the tag you assigned to your uploaded container image. Make sure “Project service role” and “New service role” are selected for the image pull credentials and service role (respectively). Accept the default role name.
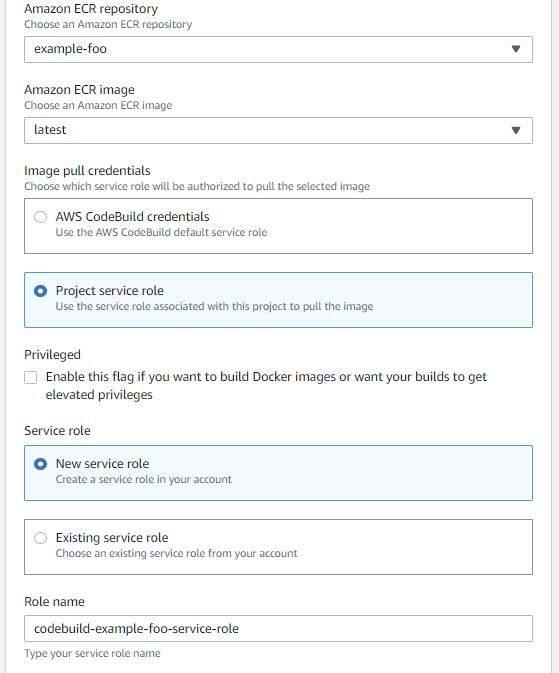
Select “Use a buildspec file” and input “buildspec.yaml” in the buildspec name.
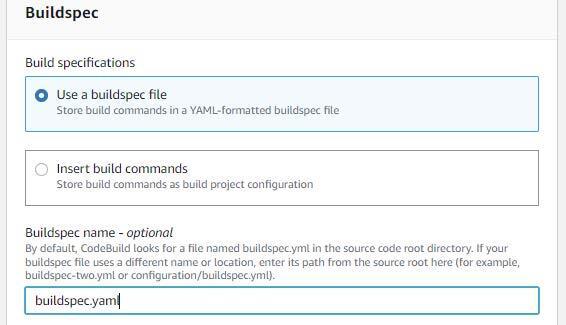
Leave the remaining defaults selected and then click “Continue to CodePipeline”.
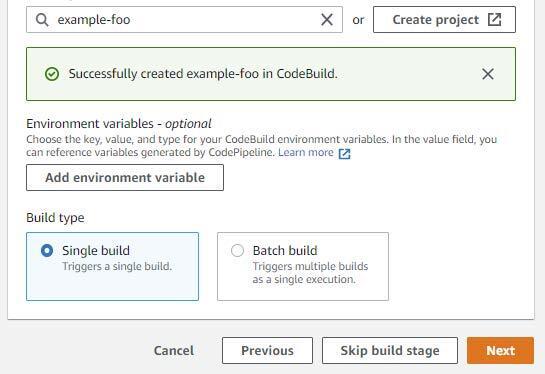
Accept the remaining defaults and click “Next” once you have returned to the “Add build stage” step and verify that your CodeBuild project was successfully created.
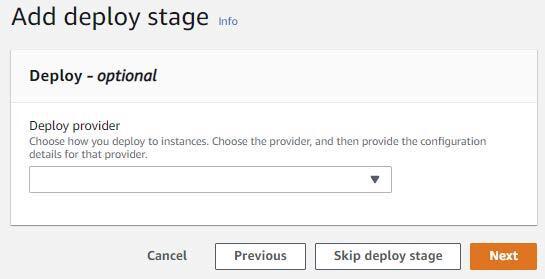
Choose to skip the deploy stage.
Review your settings and click “Create Pipeline” once you are satisfied with your input. You will be shown something like the following once your pipeline has finished creating.
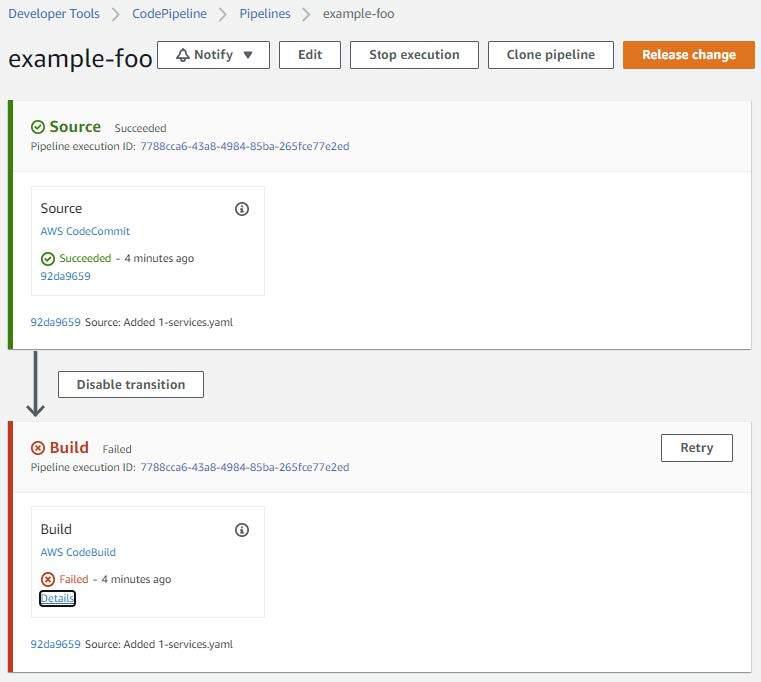
The initial build will have failed due to various AWS and Kubernetes permissions issues.
The first of these issues will entail granting the IAM service role created by the CodeBuild project the ability to perform the “eks:DescribeCluster” action on the EKS cluster we’re using.
Prior to making any IAM permission changes, we will first need to obtain the CodeBuild project role name and the ARN for the EKS cluster we’re using. You can obtain this information using the AWS cli in the following manner
$ aws codebuild batch-get-projects --names example-foo | jq -rM '.projects[].serviceRole' | sed 's/.*\///'
codebuild-example-foo-service-role

$ aws eks describe-cluster --name example-foo-cluster | jq -rM '.cluster.arn'
arn:aws:eks:us-west-2:111122223333:cluster/example-foo-cluster
With this information, we’ll add the following inline policy to the CodeBuild project role and make sure to update the resource to match the EKS cluster ARN acquired above.
{
    "Version": "2012-10-17",
    "Statement": [
        {
            "Effect": "Allow",
            "Action": [
                "eks:DescribeCluster"
            ],
            "Resource": [
                "arn:aws:eks:us-west-2:111122223333:cluster/example-foo-cluster"
            ]
        }
    ]
}
We also need to provide the CodeBuild project role with various permissions to operate within our EKS cluster. An easy approach to affording the desired access would be to associate this role with the “system:masters” group within the “aws-auth” Kubernetes configuration map. However, I think it’s a better idea to show you how to constrain a role to a given namespace. The “system:masters” group gives an IAM principal full administrative access rights to an EKS cluster. I’d prefer to guide you down the path of leveraging the Principle of Least Privilege.
Reference the following URLs for detailed information related to gaining access to an EKS cluster; this post itself will show you how to gain access to an EKS cluster, as well.
https://docs.aws.amazon.com/eks/latest/userguide/add-user-role.html
https://aws.amazon.com/premiumsupport/knowledge-center/amazon-eks-cluster-access/
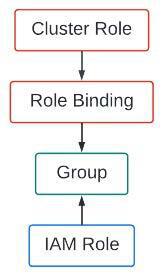
To constrain our CodeBuild project role to a given namespace, we’ll look to create a simple cluster role and use it in a role binding through a group subject. I’m referring to Kubernetes access control mechanisms, by the way. We will be linking an IAM role to the group we bind the Kubernetes cluster role to. Confusing enough? The following graphic should help visualize this.
We’ll begin working through this by taking a look at the files found in the “access-control” directory of the git repository associated with this blog post. Looking at “namespace-admin-clusterrole.yaml” we see
apiVersion: rbac.authorization.k8s.io/v1
kind: ClusterRole
metadata:
  name: namespace-admin
rules:
- apiGroups:
    - '*'
  resources:
  - '*'
  verbs:
  - '*'
This cluster role is extremely permissive in that it allows all actions (the verbs associated with API calls) on all resources in all API groups. Considering the Principle of Least Privilege, you probably wouldn’t want to use this in a production environment but Kubernetes access controls are rather complicated and not something I want to include in the scope of this blog post. Not to mention the existence of numerous resources online that already deal with this issue.
The following link is a good place to start when researching Kubernetes RBACs.
https://kubernetes.io/docs/reference/access-authn-authz/rbac/
Regardless, this cluster role is harmless without binding it to a subject via a cluster role or role binding. This role, by itself, has no bearing on any existing Kubernetes objects. It needs to be bound to a subject before any of the access controls encompassed by it can be leveraged.
Looking at “namespace-admin-rolebinding.yaml” we see:
kind: RoleBinding
metadata:
  name: trek10-namespace-admin-binding
  namespace: trek10
roleRef:
  apiGroup: rbac.authorization.k8s.io
  kind: ClusterRole
  name: namespace-admin
subjects:
- kind: Group
  name: trek10-deploy
  namespace: trek10
This role binding associates the aforementioned cluster role with a namespace (trek10) and a group (trek10-deploy). That’s it. Pretty simple.
We’ll use this group in conjunction with the “aws-auth” Kubernetes configuration map to link our CodeBuild project role to the privileges afforded to the “namespace-admin” cluster role that are bound to the “trek10” namespace via the “trek10-deploy” group. You catch all of that?
Run the following command to first backup the “aws-auth” configuration map. Backups are good, right?
$ kubectl get configmap -n kube-system aws-auth -o yaml | tee /tmp/aws-auth-backup.yaml
You will need the ARN of your CodeBuild project role prior to making any edits to the configuration map. You can obtain this via the following AWS cli invocation.
$ aws codebuild batch-get-projects --names example-foo | jq -rM '.projects[].serviceRole'
arn:aws:iam::111122223333:role/service-role/codebuild-example-foo-service-role
An important caveat to note here is that you will strip “service-role/” from this ARN when updating the “aws-auth” configuration map.
Run the following command to edit the “aws-auth” configuration map.
$ kubectl edit configmap -n kube-system aws-auth
Add the following yaml to the “mapRole” section of the configuration map. Your ARN will be different. Please adjust your edits accordingly.
   - groups:
      - trek10-deploy
      rolearn: arn:aws:iam::111122223333:role/codebuild-example-foo-service-role
      username: codebuild-example-foo-service-role
Again, note that “service-role/” was removed from the role’s ARN.
Write the file and then verify the edits were made with the following command.
$ kubectl get configmap -n kube-system aws-auth -o yaml
You should see something like the following. Note that portions of this output may not be present when you first edit it. Don’t worry about this and only add the aforementioned group designation to the “mapRoles” section.
apiVersion: v1
data:
  mapRoles: |
    - groups:
      - trek10-deploy
      rolearn: arn:aws:iam::111122223333:role/codebuild-example-foo-service-role
      username: codebuild-example-foo-service-role
    - groups:
      - system:bootstrappers
      - system:nodes
      rolearn: arn:aws:iam::111122223333:role/eks-nodegroup-role-example-foo
      username: system:node:{{EC2PrivateDNSName}}
kind: ConfigMap
metadata:
  creationTimestamp: "2022-04-01T22:48:48Z"
  name: aws-auth
  namespace: kube-system
  resourceVersion: "425349"
  uid: 97609975-7891-4849-9977-e2d4d54f4773
Now that we’ve dealt with the various access controls required for our CodeBuild project to access and operate within our EKS cluster, we’ll start looking at using CodeBuild to deploy some manifests.
We’ll need to update the buildspec.yaml file contained in our CodeCommit repository. The following environment variable needs to be set correctly in this file.
Edit buildspec.yaml and set this variable to whatever you named your EKS cluster. Commit and push your changes to the repository. This commit will trigger the CodePipeline pipeline. You should eventually be presented with successful Source and Build stages within your CodePipeline. Something like the following.
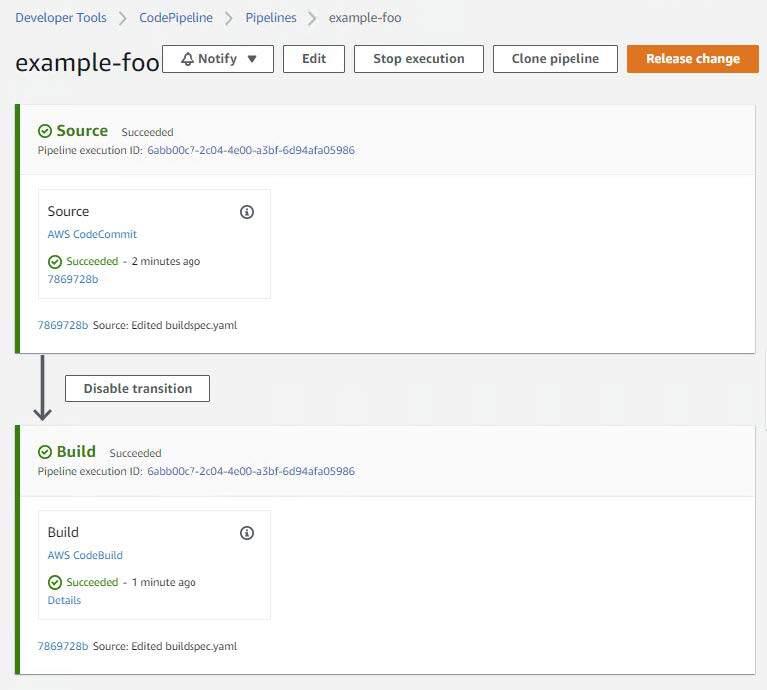
Viewing the build details should provide you with something similar to the following at the bottom of the log:
[Container] 2022/04/05 19:48:46 Running command echo "===== AWS Version ====="
===== AWS Version =====

[Container] 2022/04/05 19:48:46 Running command aws --version
aws-cli/1.18.147 Python/2.7.18 Linux/4.14.246-187.474.amzn2.x86_64 exec-env/AWS_ECS_EC2 botocore/1.18.6

[Container] 2022/04/05 19:48:46 Running command echo "===== Setup ~/.kube/config ====="
===== Setup ~/.kube/config =====

[Container] 2022/04/05 19:48:46 Running command aws eks update-kubeconfig --name $CLUSTER_NAME --region $AWS_REGION
Added new context arn:aws:eks:eu-west-2:111122223333:cluster/example-foo-cluster to /root/.kube/config

[Container] 2022/04/05 19:48:48 Phase complete: PRE_BUILD State: SUCCEEDED
[Container] 2022/04/05 19:48:48 Phase context status code:  Message:
[Container] 2022/04/05 19:48:48 Entering phase BUILD
[Container] 2022/04/05 19:48:48 Running command echo "===== Executing Deployment ====="
===== Executing Deployment =====

[Container] 2022/04/05 19:48:48 Running command /tmp/run.sh
Linting deployment-manifests/example-deployments.yaml
deployment.apps/example-foo configured (dry run)
Linting non-deployment-manifests/0-namespace.yaml
namespace/trek10 configured (dry run)
Linting non-deployment-manifests/1-services.yaml
service/example-foo-svc configured (dry run)
Applying non-deployment-manifests/0-namespace.yaml
namespace/trek10 unchanged
Applying non-deployment-manifests/1-services.yaml
service/example-foo-svc unchanged
deployment.apps/example-foo unchanged
Checking status of example-foo deployment
Deployment example-foo Successful

[Container] 2022/04/05 19:49:01 Phase complete: BUILD State: SUCCEEDED
[Container] 2022/04/05 19:49:01 Phase context status code:  Message:
[Container] 2022/04/05 19:49:01 Entering phase POST_BUILD
[Container] 2022/04/05 19:49:01 Phase complete: POST_BUILD State: SUCCEEDED
[Container] 2022/04/05 19:49:01 Phase context status code:  Message:
Looking closely we will see that nothing was changed as a result of the commit we enacted. This is evidenced in the following build log entries.
Applying non-deployment-manifests/0-namespace.yaml
namespace/trek10 unchanged
Applying non-deployment-manifests/1-services.yaml
service/example-foo-svc unchanged
deployment.apps/example-foo unchanged
Checking status of example-foo deployment
Deployment example-foo Successful
Nothing changed simply because the same manifests were already applied to the cluster earlier at the start of this post. Basically, Kubernetes was smart enough to recognize that nothing changed.
Knowing this, let’s now enact a change that will force a redeployment of the containers used by the “example-foo” deployment. But prior to doing so, let’s capture the current pod names living in the “trek10” namespace.
$ kubectl get -n trek10 po
NAME                           READY   STATUS    RESTARTS   AGE
example-foo-79fc64f66c-7vxf6   1/1     Running   0          20m
example-foo-79fc64f66c-8t6fj   1/1     Running   1          21m
example-foo-79fc64f66c-n5qqp   1/1     Running   0          21m
Let’s also double-check that our application is returning the expected version in its response to requests made to its apex route.
$ kubectl run test --rm -it --restart=Never --image=alpine/curl -- /bin/sh -c 'curl http://10.1.51.164:30080'
{ "team": "foo", "version": "1.0.0" }
With everything looking good, we’ll now edit the “example-deployments.yaml” file located in the “deployment-manifests” directory of our CodeCommit repository and change the value of the CONTENT environment variable to match the following.
- name: CONTENT
  value: '{ "team": "foo", "version": "1.0.1" }'
Altering this file and then making a commit will trigger our pipeline again. Listing the pods in the “trek10” namespace during the build process will detail their eventual replacement. You should be able to see something like the following during the build.
$ kubectl get -n trek10 po
NAME                           READY   STATUS              RESTARTS   AGE
example-foo-79fc64f66c-7vxf6   1/1     Terminating         0          26m
example-foo-79fc64f66c-8t6fj   1/1     Running             1          27m
example-foo-79fc64f66c-n5qqp   1/1     Running             0          27m
example-foo-d6698f6fd-6jzpl    1/1     Running             1          45s
example-foo-d6698f6fd-zfllf    0/1     ContainerCreating   0          1s
Checking the build log will also show that the “example-foo” deployment was updated. Note the presence of the “configured” keyword instead of “unchanged”.
Applying non-deployment-manifests/0-namespace.yaml
namespace/trek10 unchanged
Applying non-deployment-manifests/1-services.yaml
service/example-foo-svc unchanged
deployment.apps/example-foo configured
And finally, check the content returned in the application’s response again.
$ kubectl run test --rm -it --restart=Never --image=alpine/curl -- /bin/sh -c 'curl http://10.1.51.164:30080'
{ "team": "foo", "version": "1.0.1" }
We just pushed out an application deployment to our EKS cluster using a CI/CD pipeline triggered from a git commit. Great success!
And now that we’ve worked through a successful CI/CD pipeline deployment, I need to backtrack a bit and talk about a fairly important component of this process that wasn’t mentioned. The build container used by our CodeBuild project makes use of a script that handles deploying the Kubernetes manifests we stored in our CodeCommit repository. More specifically, the “run.sh” file found in the “build-container” directory of the git repository associated with this blog post.
I went a little above-and-beyond when creating this script for a client that was looking to use an AWS-native CI/CD pipeline to deploy an application in EKS. I wanted to make sure that any issues encountered during an application rollout were gracefully handled and reported in the build log. A caveat to note about this script is that Kubernetes deployment objects are placed into a specific directory while all other objects are placed into another. This allows the script to monitor deployment objects for completion.
The general logic of this script performs the following.
In all honesty, you could probably dump all of your Kubernetes manifests into a single file or directory, perform a single “kubectl apply”, and let Kubernetes sort things out. Granted, this wouldn’t be the best approach when it comes to handling deployment rollouts for production applications. My script should serve as a good starting point for attempting to gracefully handle issues associated with applying updated manifests to an EKS cluster.
And that’s about it, folks. Thanks for sticking with me. I know this was a lengthy post and I hope you found value in its content.
Until next time!

Build an IPv6-to-IPv4 proxy using CloudFront to enable connectivity with IPv4-only AWS services.