Spotlight
Demoing the Blues Wifi + Cell Communication Module
Explore the Blues Cell + Wifi communication module on a Raspberry Pi Zero, Notehub, and thoughts on the pros and cons of utilizing Blues in your IoT project.


Hello again and welcome back to my Trek10 IoT blog post series! In my previous post, I walked readers through how to connect IoT devices to the AWS IoT Core service and interact with MQTT topics. We focused on the ingestion of device data through the lens of a simulated IoT device making use of certificate authentication.
In this post, we’ll look at how we can listen to topics, format message payloads, and route messages to other AWS services. All of these capabilities are made possible through the use of the power and flexibility of AWS IoT Rules. This post builds on my first one so please work through it if you haven’t already.
As this post is rather lengthy, I am hoping the following section descriptions and links will help you navigate through our second IoT journey.
Before we begin, please note that this post references files found in the following Git repository.
Let’s begin by first discussing the script we’ll use to simulate an IoT device that’s been configured to publish messages to AWS IoT Core. Please reference my first post in this series for more information on how to configure the IoT Core service and IoT devices such that they can publish to MQTT topics.
The publish script generates simulated sensor data for a weather station. It will produce JSON data similar to the following.
{
   "Scale": "c",
   "Temperature": 12.6,
   "Humidity": 100,
   "Timestamp": 1669044698,
   "Barometer": 28.26,
   "wind":{
      "Velocity": 31.76,
      "Bearing": 317.14
   },
   "Device": 3
}
This publish script is configured to send messages to the "trek10/initial” topic via the use of a configuration variable found at the top of the file. It relies on a temporary directory named "tmp” that will be created in the current working directory to maintain a history of device data so that simulated data points don’t incur great variances. This will help when graphing data produced by the script.
Another important caveat to note about this script is that it simulates IoT devices that report temperatures in either Celsius or Fahrenheit. One might ask why you wouldn’t just configure all devices to utilize one scale over the other. This is a valid point! One that we’ll revisit in another post but, for now, we’ll simply accept that some of our devices may use either temperature scale.
With the important details of our script laid out, let’s begin working with our first IoT Core rule. We’ll create a rule that performs the following:
But first, we’ll need to create an IAM role that will allow our IoT rule to publish to a new topic.
Execute the following CLI commands to create a JSON policy document that will be used to create our first rule’s role.
ACOUNT_ID="YOUR-AWS-ACCOUNT-ID"
REGION="us-west-1"

cat <<EOF > /tmp/trek10-iot-role-1.json
{
    "Version": "2012-10-17",
    "Statement": [
        {
            "Action": "iot:Publish",
            "Resource": "arn:aws:iot:${REGION}:${ACOUNT_ID}:topic/trek10/final",
            "Effect": "Allow"
        }
    ]
}
EOF
Please note that you will need to set the REGION and ACCOUNT_ID variables to the region and account ID (respectively) you are working in. These variables will be used several times throughout this blog post.
The role we’ll be creating will need to be assumable by the AWS IoT service. Execute the following CLI commands to create a JSON trust policy document that will be used by our first rule’s role.
cat <<EOF > /tmp/trek10-iot-trust-policy.json
{
    "Version": "2008-10-17",
    "Statement": [
        {
            "Effect": "Allow",
            "Principal": {
                "Service": "iot.amazonaws.com"
            },
            "Action": [
                "sts:AssumeRole"
            ]
        }
    ]
}
EOF
With our policy documents written, we’ll create a role and attach an inline policy to it using the following AWS CLI commands.
aws iam create-role --role-name trek10-iot-role-1 \
    --assume-role-policy-document file:///tmp/trek10-iot-trust-policy.json

aws iam put-role-policy --role-name trek10-iot-role-1 \
    --policy-name trek10-iot-role-1-policy \
    --policy-document file:///tmp/trek10-iot-role-1.json
Next thing we need to do is create a CloudWatch log group that can be used as a target for error messages when a problem arises with an IoT rule.
Create a log group and set a short-term retention policy using the following CLI commands. The short-term retention policy is meant to keep costs low in our laboratory environment.
aws logs create-log-group --log-group-name '/aws/iot/trek10-iot-logs'

aws logs put-retention-policy --log-group-name '/aws/iot/trek10-iot-logs' \
    --retention-in-days 1
We’ll also need a role to be used by the rule’s error action. If a problem occurs when a rule attempts to trigger an action, the AWS IoT rules engine triggers an error action, if one is specified for the rule. In our case, we’ll write debug information to our previously created CloudWatch log group should a problem arise.
You can read more on this topic at the following link.
https://docs.aws.amazon.com/iot/latest/developerguide/rule-error-handling.html
Execute the following CLI commands to create a JSON error action policy document used by our first rule’s error action role.
cat <<EOF > /tmp/trek10-iot-error-action-policy.json
{
    "Version": "2012-10-17",
    "Statement": [
        {
            "Action": [
                "logs:CreateLogStream",
                "logs:DescribeLogStreams",
                "logs:PutLogEvents"
            ],
            "Resource": "arn:aws:logs:${REGION}:${ACOUNT_ID}:log-group:/aws/iot/trek10-iot-logs:*",
            "Effect": "Allow"
        }
    ]
}
EOF
Create the error role and attach an inline policy to it using the following AWS CLI commands.
aws iam create-role --role-name trek10-iot-error-action-role \
    --assume-role-policy-document file:///tmp/trek10-iot-trust-policy.json

aws iam put-role-policy --role-name trek10-iot-error-action-role \
    --policy-name trek10-iot-error-action-role-policy \
    --policy-document file:///tmp/trek10-iot-error-action-policy.json
Now that we have our rule prerequisites, let’s move closer towards actually creating our first rule. Again, this rule will transform celsius values to Fahrenheit, create a received timestamp, alter the wind parameters, and republish our transformed message to a different topic.
To create our rule we’ll need to first develop a query statement. This query statement will consist of the following.
This is basically just a traditional SQL SELECT statement. You can read more about the IoT SQL specifics at the following link.
https://docs.aws.amazon.com/iot/latest/developerguide/iot-sql-reference.html
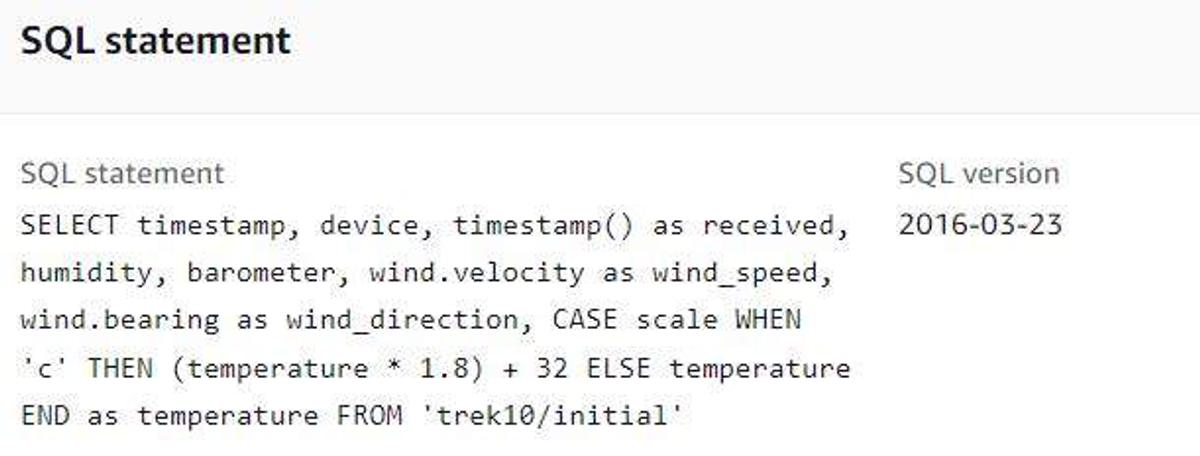
The query statement we’ll be using will look like the following.
SELECT timestamp,
    device,
    timestamp() as received,
    humidity,
    barometer,
    wind.velocity as wind_speed,
    wind.bearing as wind_direction,
CASE
    scale WHEN 'c' THEN (temperature * 1.8) + 32
ELSE
temperature
END
    as temperature
FROM 'trek10/initial'
Take a minute to read over this SQL statement and understand how each of the transformations was achieved. Review the IoT SQL Reference if this doesn’t make sense right away.
We’ll need to obtain the ARNs for the roles we created earlier prior to creating our rule. Use the following to capture these ARNs.
ROLE_NAME='trek10-iot-role-1'
ROLE_ARN=$(aws iam get-role --role-name $ROLE_NAME | jq -rM '.Role.Arn')

ERROR_ACTION_ROLE_NAME='trek10-iot-error-action-role'
ERROR_ACTION_ROLE_ARN=$(aws iam get-role --role-name $ERROR_ACTION_ROLE_NAME | jq -rM '.Role.Arn')
To make things easier to read and execute, we’ll populate a few more variables.
RULE_NAME="trek10_iot_rule_1"
TOPIC="trek10/final"
DESCRIPTION="Trek10 IoT rule number 1"
LOG_GROUP_NAME="/aws/iot/trek10-iot-logs"
QUERY="SELECT timestamp, device, timestamp() as received, humidity, barometer, wind.velocity as wind_speed, wind.bearing as wind_direction, CASE scale WHEN 'c' THEN (temperature * 1.8) + 32 ELSE temperature END as temperature FROM 'trek10/initial'"
Using these variables, we’ll create a JSON file that we use to create our first rule. Execute the following CLI commands to populate our rule payload file.
cat <<EOF > /tmp/trek10-rule-payload-1.json
{
    "sql":"${QUERY}",
    "description":"${DESCRIPTION}",
    "actions":[
        {
            "republish":{
                "roleArn":"${ROLE_ARN}",
                "topic":"${TOPIC}",
                "qos":0
            }
        }
    ],
    "awsIotSqlVersion": "2016-03-23",
    "errorAction":{
        "cloudwatchLogs":{
            "roleArn":"${ERROR_ACTION_ROLE_ARN}",
            "logGroupName":"${LOG_GROUP_NAME}"
        }
    }
}
EOF
You can read up on how I constructed our rule’s JSON payload at the following link.
https://awscli.amazonaws.com/v2/documentation/api/latest/reference/iot/create-topic-rule.html
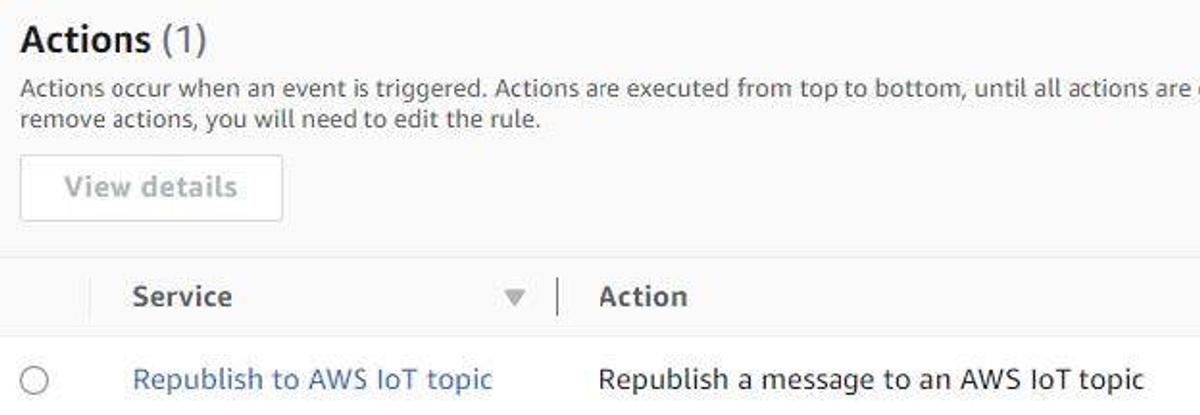
It should be pretty clear that the main components of our payload consist of:
Now use the following AWS CLI commands to actually create our rule.
aws iot create-topic-rule --rule-name "${RULE_NAME}" \
    --topic-rule-payload file:///tmp/trek10-rule-payload-1.json
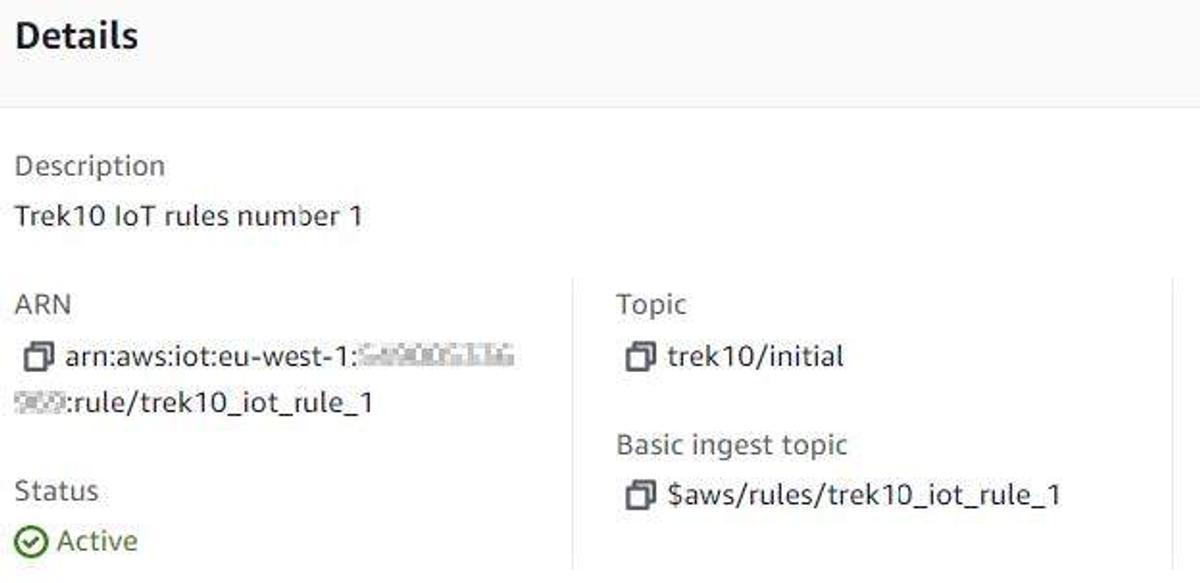
Looking at our new rule through the web console we see the following.
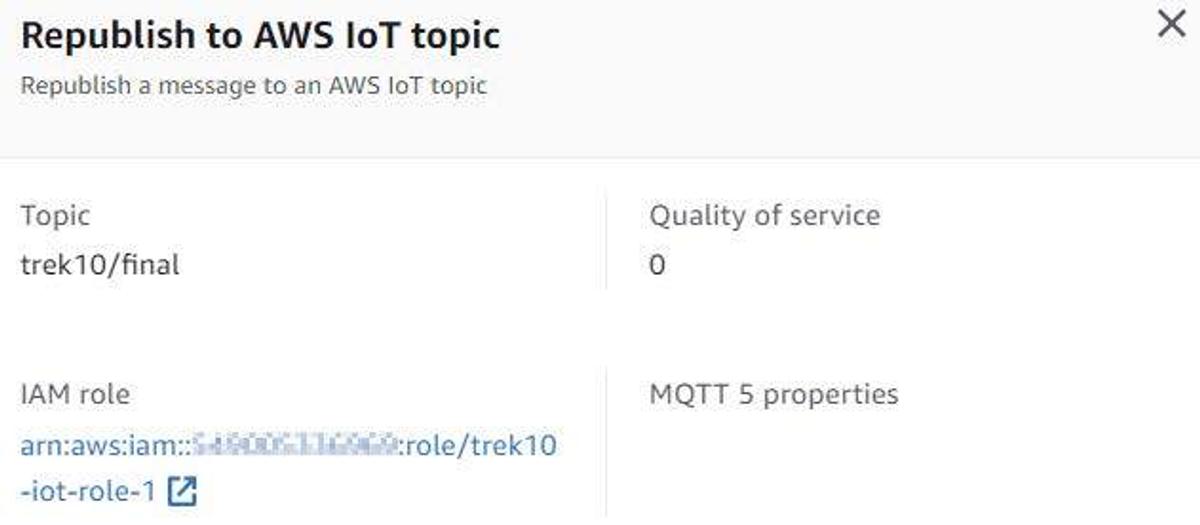
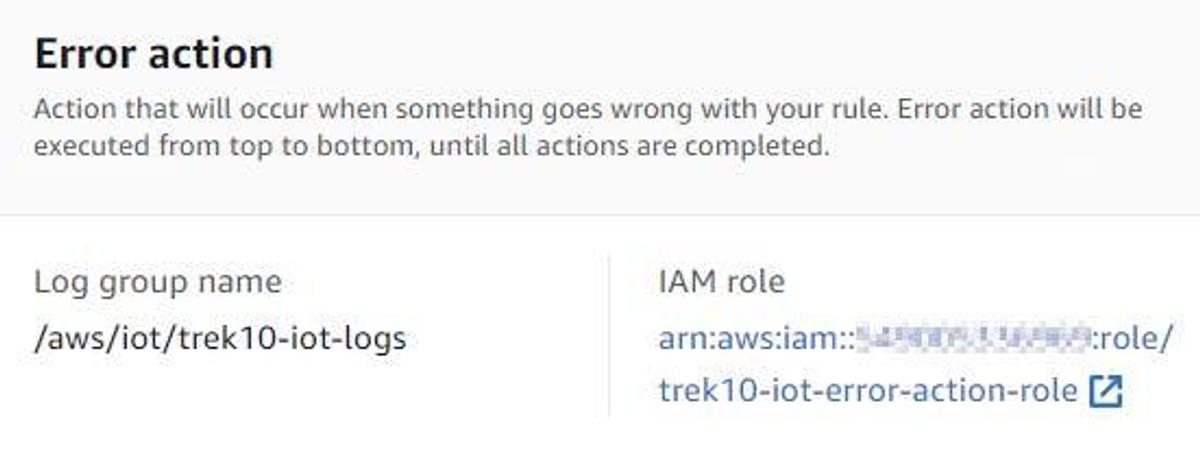
Let’s now test our rule to ensure it functions properly by using our IoT device simulation script. Execute the following command to send some telemetry data to AWS IoT Core.
python3 ./publish-to-iot-core.py
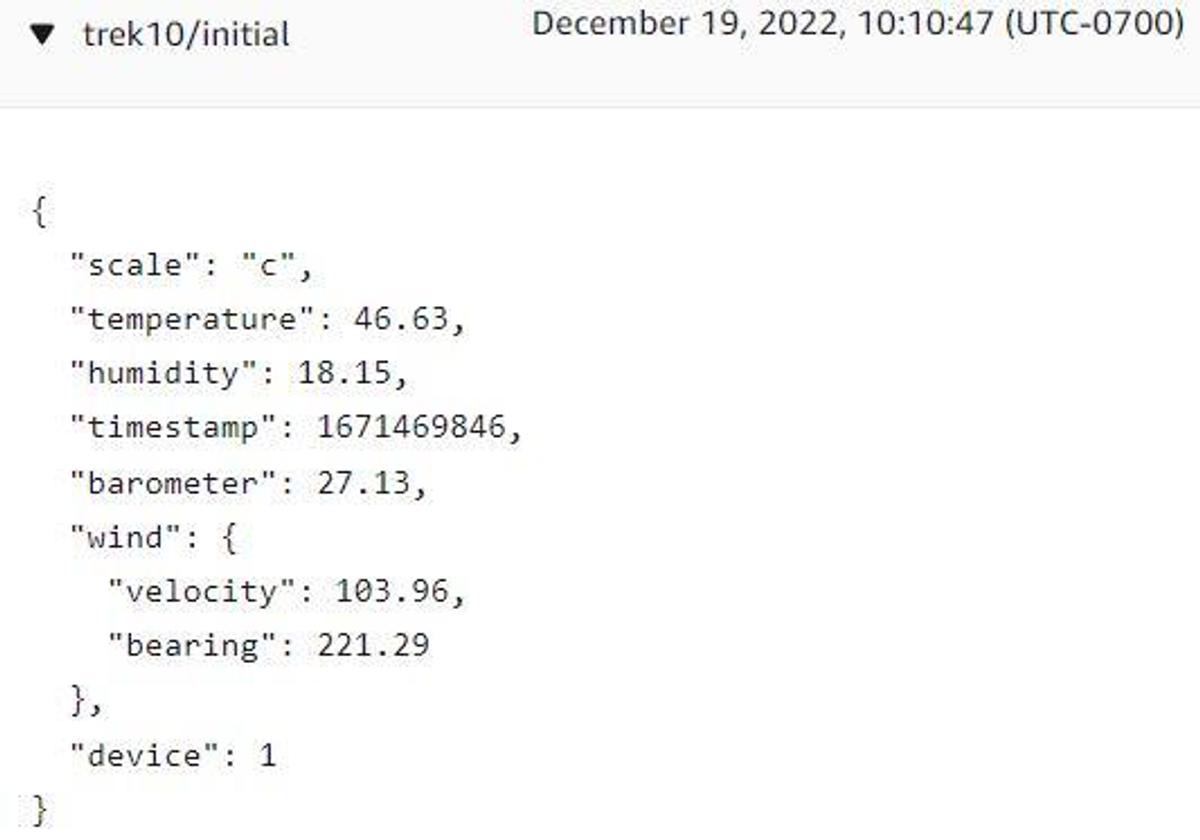
Published message: {"scale": "c", "temperature": 46.63, "humidity": 18.15, "timestamp": 1671469846, "barometer": 27.13, "wind": {"veloci": 103.96, "bearing": 221.29}, "device": 1}
Connected with result code 0
Checking the ‘trek10/initial’ topic via the MQTT test client interface we see that IoT Core successfully received our message.
Looking at the ‘trek10/final’ topic we see that a timestamp has been added, our transformations have successfully taken place, and the updated message was published to the new topic.
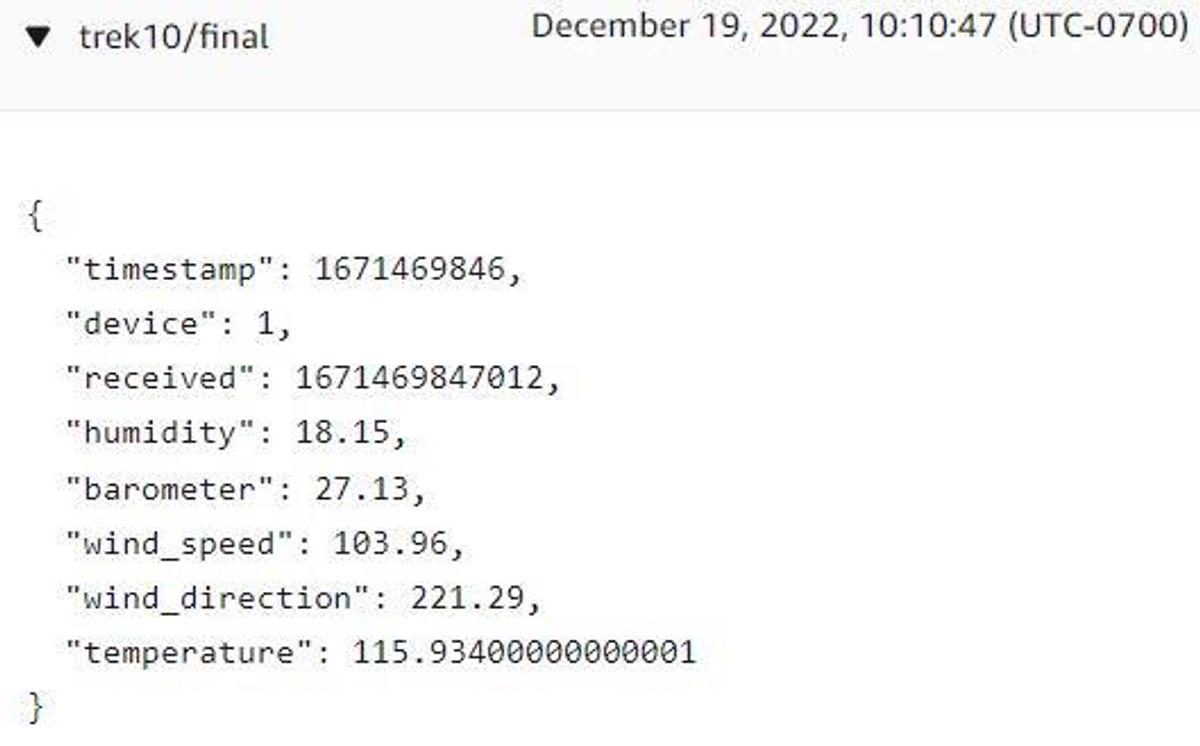
Success! Always feels good to see hard work pay off.
So going forward in this blog, we’ll build our subsequent rules by reading messages from the topic being written to by our first rule ("trek10/final”).
With our first IoT rule successfully constructed, we’ll move on to another one where we’ll write messages to an Amazon S3 bucket and Amazon DynamoDB table. These two actions will be encompassed by a single rule with multiple actions.
Prior to creating our second rule we’ll need to create an S3 bucket and a DynamoDB table. We’ll execute the following AWS CLI commands to create both of these resources.
BUCKET_NAME="A-UNIQUE-BUCKET-NAME"

aws s3api create-bucket --bucket ${BUCKET_NAME} \
    --create-bucket-configuration LocationConstraint=${REGION} \
    --region ${REGION}

aws s3api put-public-access-block --bucket ${BUCKET_NAME} \
    --public-access-block-configuration "BlockPublicAcls=true,IgnorePublicAcls=true,BlockPublicPolicy=true,RestrictPublicBuckets=true"

TABLE_NAME="A-UNIQUE-TABLE-NAME"

aws dynamodb create-table \
    --table-name ${TABLE_NAME} \
    --attribute-definitions \
        AttributeName=device,AttributeType=N \
        AttributeName=timestamp,AttributeType=N \
    --key-schema \
        AttributeName=device,KeyType=HASH \
        AttributeName=timestamp,KeyType=RANGE \
    --billing-mode PROVISIONED \
    --provisioned-throughput ReadCapacityUnits=3,WriteCapacityUnits=3
Please make sure to set the BUCKET_NAME and TABLE_NAME variables to unique values. Make note of other commands and IAM policies in this post that make use of these variables.
Next, we’ll need to create another role for our second rule so it can write messages to an S3 bucket and a DynamoDB table. Execute the following CLI commands to create a JSON policy document that will be used to create our second rule’s role.
cat <<EOF > /tmp/trek10-iot-role-2.json
{
    "Version": "2012-10-17",
    "Statement": [
        {
            "Action": "dynamodb:PutItem",
            "Resource": "arn:aws:dynamodb:${REGION}:${ACOUNT_ID}:table/${TABLE_NAME}",
            "Effect": "Allow"
        },
        {
            "Action": "s3:PutObject",
            "Resource": "arn:aws:s3:::${BUCKET_NAME}/*",
            "Effect": "Allow"
        }
    ]
}
EOF
Using this policy document, and the trust policy from before, we’ll create a role and attach an inline policy to it using the following AWS CLI commands.
aws iam create-role --role-name trek10-iot-role-2 \
    --assume-role-policy-document file:///tmp/trek10-iot-trust-policy.json

aws iam put-role-policy --role-name trek10-iot-role-2 \
    --policy-name trek10-iot-role-2-policy \
    --policy-document file:///tmp/trek10-iot-role-2.json
We now need to construct our second rule’s query statement. The query statement we’ll use will look like the following.
SELECT * FROM 'trek10/final'
We’ll need to obtain the ARN for the role we just created prior to creating our rule. Use the following to capture this ARN.
ROLE_NAME='trek10-iot-role-2'
ROLE_ARN=$(aws iam get-role --role-name $ROLE_NAME | jq -rM '.Role.Arn')
Note that we’ve already captured the error action role’s ARN from previous work.
To continue making things easier to read and execute, we’ll populate a few more variables.
RULE_NAME="trek10_iot_rule_2"
TOPIC="trek10/final"
DESCRIPTION="Trek10 IoT rule number 2"
LOG_GROUP_NAME="/aws/iot/trek10-iot-logs"
KEY="\${parse_time('yyyy', timestamp(), 'UTC')}/\${parse_time('MM', timestamp(), 'UTC')}/\${parse_time('dd', timestamp(), 'UTC')}/\${parse_time('HH', timestamp(), 'UTC')}/\${device}/\${timestamp()}"
QUERY="SELECT * FROM 'trek10/final'"
Before we continue, take a look at the KEY variable we just populated. This is what we’re going to use to write messages to S3 in an intuitive format that will allow us to find data for a given point in time relatively quickly.
Put in a (slightly) more readable format, this looks like the following.
${ parse_time('yyyy', timestamp(), 'UTC') } /
${ parse_time('MM', timestamp(), 'UTC') } /
${ parse_time('dd', timestamp(), 'UTC') } /
${ parse_time('HH', timestamp(), 'UTC') } /
${device} /
${ timestamp() }
We’re making heavy use of the “parse_time” function to obtain components of a timestamp. This ends up creating key structures like the following:
Year/Month/Day/Hour/DeviceID/Timestamp
Which ends up looking something like this.
2022/12/19/23/0/1671493316463
You can convert the timestamp portion of the key to a human-readable format by doing the following.
date -d @$((1671493316463 / 1000))

Mon 19 Dec 2022 11:41:56 PM UTC
Which matches the listed key structure. If interested, you can read more about AWS IoT SQL functions at the following link.
https://docs.aws.amazon.com/iot/latest/developerguide/iot-sql-functions.html
With that said, we’ll now use these variables to create a JSON file we can use to create our second rule. Execute the following CLI commands to populate our second rule’s payload file.
cat <<EOF > /tmp/trek10-rule-payload-2.json
{
    "sql":"${QUERY}",
    "description":"${DESCRIPTION}",
    "actions":[
        {
            "dynamoDBv2":{
                "roleArn":"${ROLE_ARN}",
                "putItem":{
                    "tableName":"${TABLE_NAME}"
                }
            }
        },
        {
            "s3":{
                "roleArn":"${ROLE_ARN}",
                "bucketName":"${BUCKET_NAME}",
                "key":"${KEY}"
            }
        }
    ],
    "awsIotSqlVersion": "2016-03-23",
    "errorAction":{
        "cloudwatchLogs":{
            "roleArn":"${ERROR_ACTION_ROLE_ARN}",
            "logGroupName":"${LOG_GROUP_NAME}"
        }
    }
}
EOF
Note that we repurposed the error action role and log group for this rule.
Using this payload file, we’ll now create our second rule via the following AWS CLI commands.
aws iot create-topic-rule --rule-name "${RULE_NAME}" \
    --topic-rule-payload file:///tmp/trek10-rule-payload-2.json
Again, let’s test our newly created rule to ensure it functions properly by using our IoT device simulation script. Execute the following command to send some telemetry data to AWS IoT Core.
python3 ./publish-to-iot-core.py

Published message: {"scale": "c", "temperature": -5.21, "humidity": 50.82, "timestamp": 1671730637, "barometer": 30.46, "wind": {"velocity": 23.7, "bearing": 120.07}, "device": 0}
Connected with result code 0
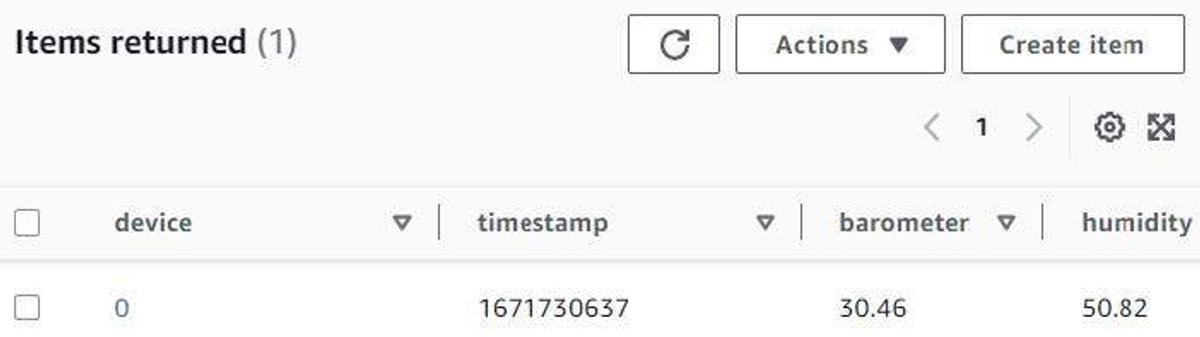
Checking the DynamoDB table named "${TABLE_NAME}” in the AWS web console we should see the following.
Looking in the S3 bucket named "${BUCKET_NAME}” we should see the following.
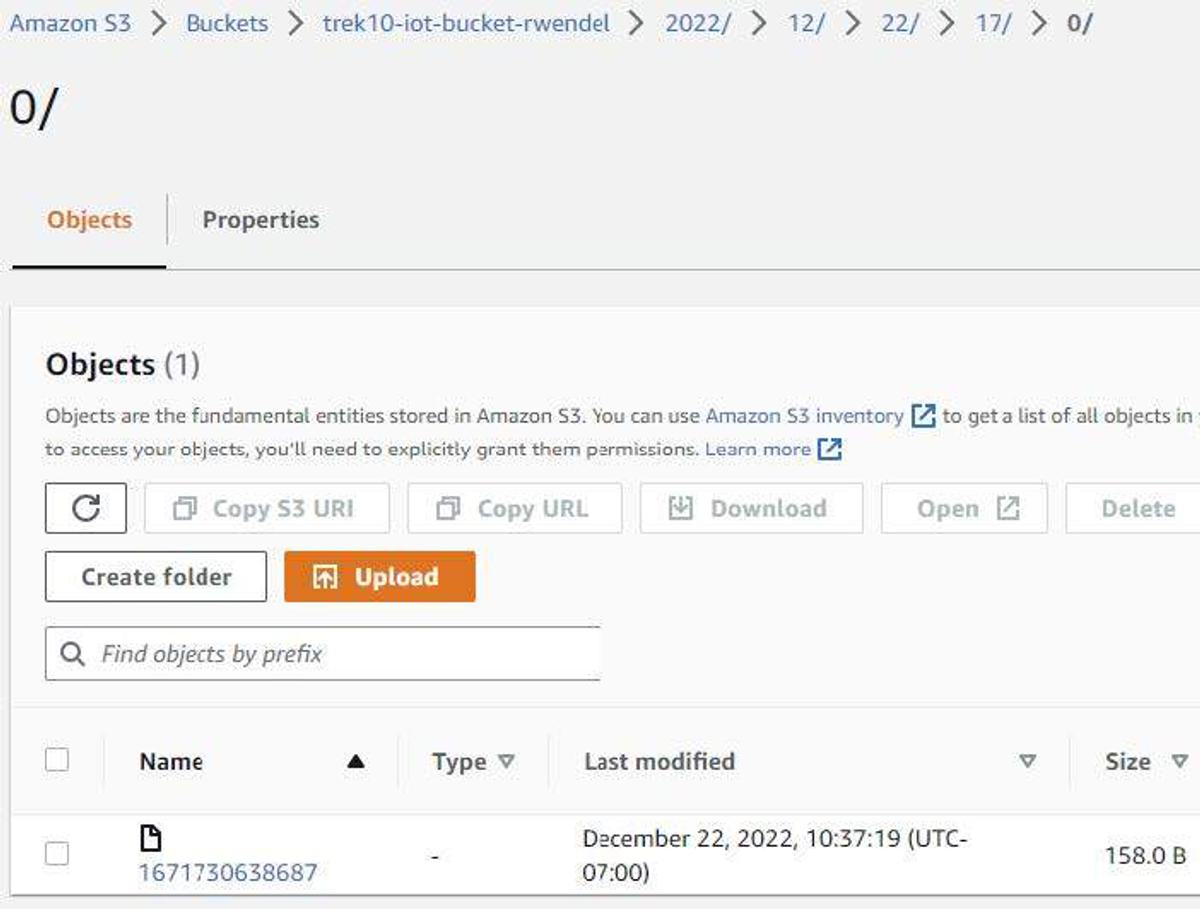
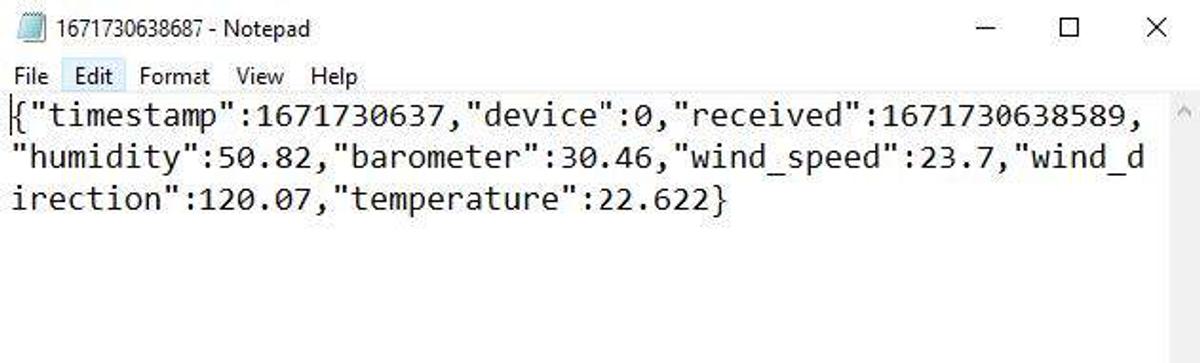
Notice that the S3 file key is built using folders made from the components of a timestamp. Downloading the resulting file (currently "1671730638687”) and opening it should yield something like the following.
Success! Woohoo!
Let’s recap what we’ve accomplished after working through this exercise. Through the use of AWS IoT rules, we were able to:
Both are great examples of the power and flexibility afforded by the AWS IoT Core service when it comes to ingesting and processing IoT telemetry data.
I had wanted to add another example where we’d watch the re-publish queue (trek10/final) for messages with temperatures over 120 degrees Fahrenheit and then alert on them using SNS. As this post has grown rather long, I will leave it up to the reader to work through this exercise.
You can find a tutorial for routing IoT messages to SNS at the following link:
https://docs.aws.amazon.com/iot/latest/developerguide/iot-rules-tutorial.html
I’ve actually provided a solution that can be found in the GitHub repository that accompanies this blog post series.
Additionally, I’ve also created a script to automate all of the steps we worked through in this post. Take a look at it if you’re struggling with the examples provided in this post.
As we’ve created a good number of AWS resources during this blog post, I created a cleanup script you can use to ensure you don’t leave anything behind that might accrue expenses should you forget to delete them. There is another one for the SNS solution, as well.
Make note that you’ll need to configure some of the variables inside each script in order for them to function properly. More specifically, the account ID, region, and S3 bucket.
And lastly, thanks for spending time with me again! In my next post, I’ll be focusing on using AWS IoT Jobs to execute tasks on a fleet of IoT devices. We’re going to find a way to automate pushing configuration information to devices to ensure that temperatures are being reported using the Fahrenheit scale. Stay tuned.

Explore the Blues Cell + Wifi communication module on a Raspberry Pi Zero, Notehub, and thoughts on the pros and cons of utilizing Blues in your IoT project.