Spotlight
Demoing the Blues Wifi + Cell Communication Module
Explore the Blues Cell + Wifi communication module on a Raspberry Pi Zero, Notehub, and thoughts on the pros and cons of utilizing Blues in your IoT project.


Are you interested in learning more about the AWS IoT suite of services but aren’t sure where to begin? If so, you’re in the right place as I, too, have been wanting to jump into IoT through the lens of the AWS cloud!
With this post, I am embarking on a multi-part journey where I’ll work through several proof-of-concept examples that simulate basic AWS IoT capabilities. My plan is to create 3-4 blog posts that will suffice in providing the reader (and myself) with a good introduction to the world of IoT. The first part of this series will encompass learning how to write and receive messages to and from IoT Core topics using certificate authentication.
Let’s begin by looking at how AWS describes its IoT Core service.
From AWS’ documentation:
“AWS IoT Core is a managed cloud service that lets connected devices easily and securely interact with cloud applications and other devices. AWS IoT Core can support billions of devices and trillions of messages, and can process and route those messages to AWS endpoints and to other devices reliably and securely. With AWS IoT Core, your applications can keep track of and communicate with all your devices, all the time, even when they aren’t connected.
AWS IoT Core makes it easy to use AWS services such as AWS Lambda, Amazon Kinesis, Amazon S3, Amazon SageMaker, Amazon DynamoDB, Amazon CloudWatch, AWS CloudTrail, and Amazon QuickSight to build IoT applications that gather, process, analyze and act on data generated by connected devices, without having to manage any infrastructure.”
In short, AWS IoT Core provides connectivity for devices to and from the AWS cloud and the many services it offers.
With this understanding, we’ll start this journey by learning how to write to an IoT topic using the AWS web console.
But what is an IoT topic, you ask?
MQTT is an OASIS standard messaging protocol for the Internet of Things (IoT). It is designed as an extremely lightweight publish/subscribe messaging transport that is ideal for connecting remote devices with a small code footprint and minimal network bandwidth.
An AWS IoT Core topic is a mechanism that IoT devices use to send and receive data from the AWS IoT Core service. Devices can publish and subscribe to topics with the underlying technology of these topics being MQTT.
With that out of the way, let’s finally begin publishing and subscribing to some topics using the AWS web console. For this portion of the post, I’ll assume you have elevated privileges to an AWS account and won’t go into the IAM configuration required to publish/subscribe to IoT Core topics. We’ll look at some of that later but, for now, just make sure you have admin privileges in your account and follow along.
Start by accessing the following URL (make sure your region sub-domain and parameter are set correctly).
https://us-west-1.console.aws.amazon.com/iot/home?region=us-west-1#/test
You should see something like the following:
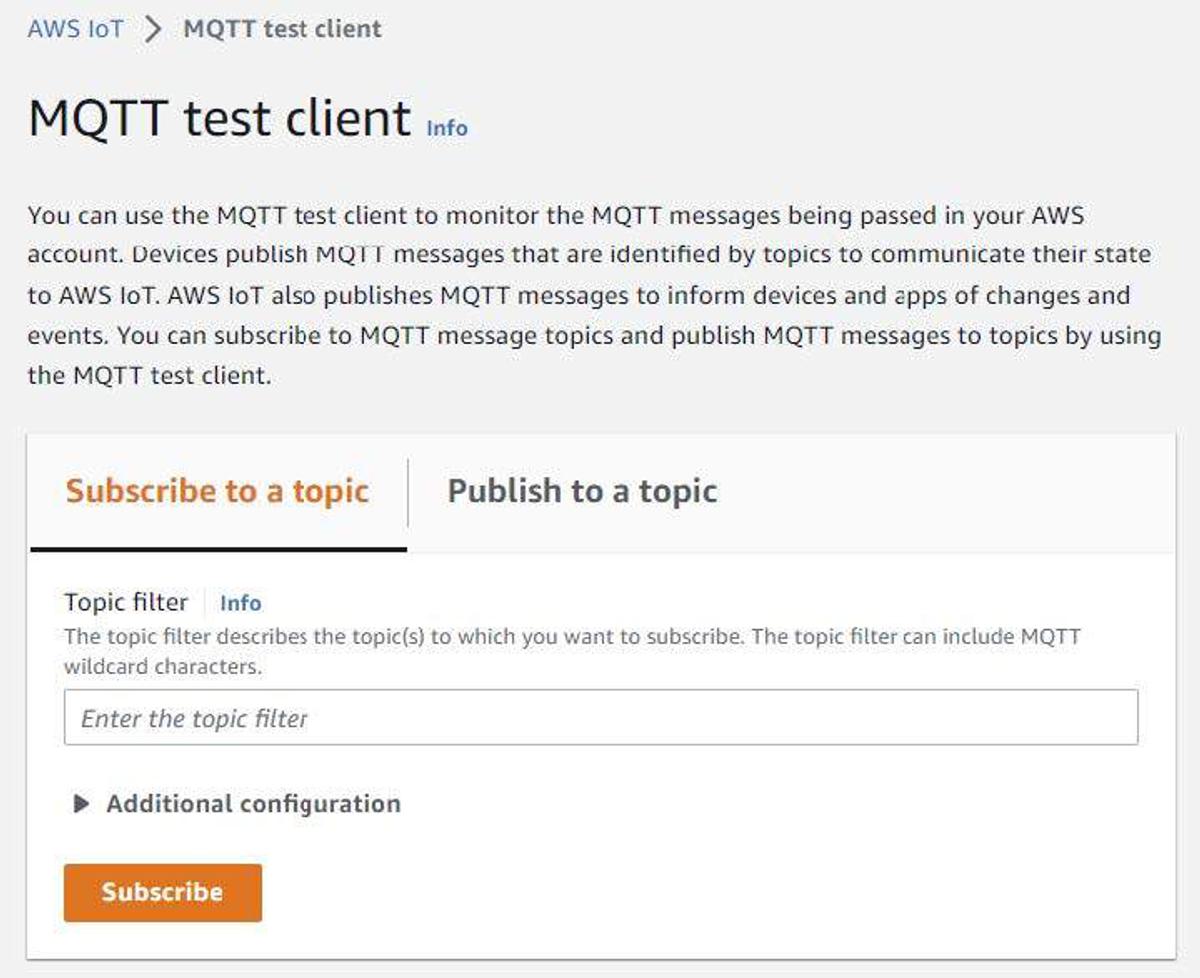
Enter something like “trek10/foo” and click the “Subscribe” button. Once done. Click the “Publish to a topic” tab and then click the “Publish” button. You’ll soon notice that the message in the payload field was successfully sent to the “trek10/foo” topic.
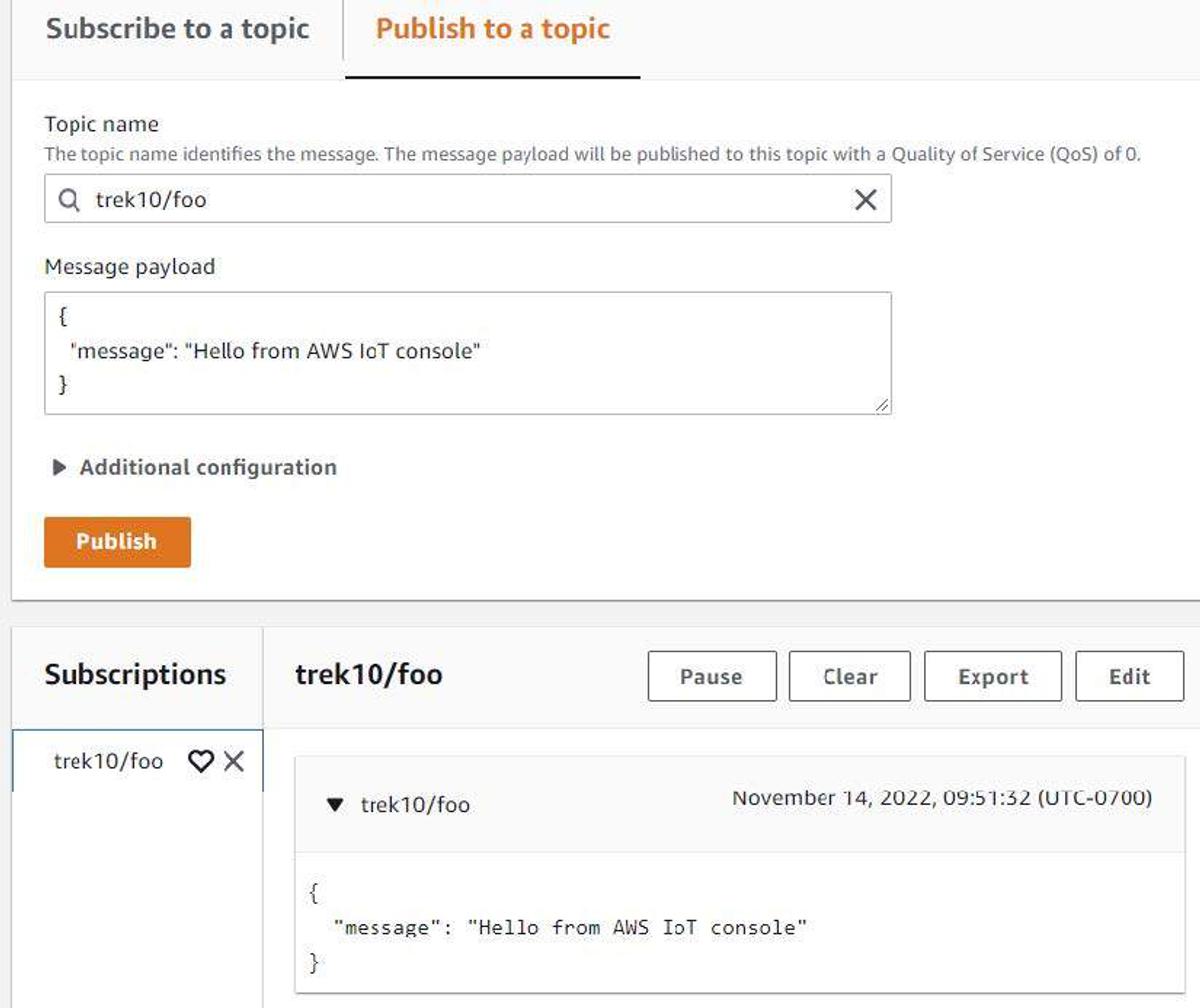
And with that, you just successfully published to a topic and viewed the received payload using the AWS web console.
Let’s now use the AWS CLI to publish another payload. Write the following to /tmp/data.json:
{
    "device": 2379127,
    "scale": "f",
    "temperature": 100,
    "humidity": 70,
    "wind": {
        "velocity": 80,
        "bearing": 273
    },
    "barometer": 27.24,
    "timestamp": 1668445116
}
Now execute the following AWS CLI command:
aws iot-data publish --topic "trek10/foo" --payload "$(cat /tmp/data.json | base64)"
You should see something like the following in the AWS web console. Note that we cannot subscribe to topics using the AWS CLI. This is why we’re staying in the web console, for now.
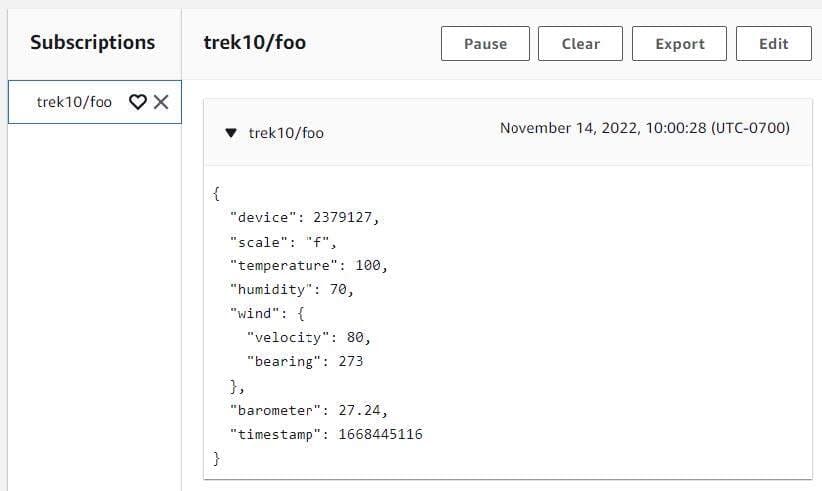
Again, if executed properly, we just successfully published to and received another IoT message from our “trek10/foo” topic.
At this point let’s start looking at what an IoT device looks like when performing the same activities. To do this we’ll first need to create an “IoT Thing” and register it with AWS IoT Core.
From AWS’ documentation:
“AWS IoT provides a registry that helps you manage things. A thing is a representation of a specific device or logical entity. It can be a physical device or sensor (for example, a light bulb or a switch on a wall). It can also be a logical entity like an instance of an application or physical entity that does not connect to AWS IoT but is related to other devices that do (for example, a car that has engine sensors or a control panel).”
Execute the following command using the AWS CLI to create an IoT Core “Thing”:
aws iot create-thing --thing-name trek10-thing-1
You should see something like the following returned on the console:
{
    "thingName": "trek10-thing-1",
    "thingArn": "arn:aws:iot:us-west-1:111222333444:thing/trek10-thing-1",
    "thingId": "06606ee8-a0f3-4ebe-bd2c-55073d132980"
}
Now that we’ve created and registered a thing, we’ll start to look at how we’re going to authenticate and authorize it to connect to and interact with AWS. This is accomplished by pairing an AWS IoT Policy with an IoT certificate and then allowing our thing to use the certificate during authentication. This form of certificate-based authentication is a very common pattern of IoT device authentication.
AWS explains IoT Policies with the following:
“AWS IoT Core policies are JSON documents. They follow the same conventions as IAM policies. AWS IoT Core supports named policies so many identities can reference the same policy document. Named policies are versioned so they can be easily rolled back.
AWS IoT Core policies allow you to control access to the AWS IoT Core data plane. The AWS IoT Core data plane consists of operations that allow you to connect to the AWS IoT Core message broker, send and receive MQTT messages, and get or update a thing's Device Shadow.”
AWS explains client certificates with the following:
“X.509 certificates provide AWS IoT with the ability to authenticate client and device connections. Client certificates must be registered with AWS IoT before a client can communicate with AWS IoT. “
This pairing of an IoT Policy and an IoT Certificate can be visualized in the following manner.

To begin working through this, let’s start by creating an IoT Policy. Write the following to /tmp/trek10-iot-policy-1.json. Note that you’ll need to change the account ID (111222333444) and region to match the ID of your AWS account and region you're working in.
{
  "Version": "2012-10-17",
  "Statement": [
    {
      "Effect": "Allow",
      "Action": "iot:Connect",
      "Resource": "arn:aws:iot:us-west-1:111222333444:client/aws-trek10-thing-*"
    },
    {
      "Effect": "Allow",
      "Action": [
        "iot:Publish",
        "iot:Receive"
      ],
      "Resource": "arn:aws:iot:us-west-1:111222333444:topic/trek10/*"
    },
    {
      "Effect": "Allow",
      "Action": "iot:Subscribe",
      "Resource": "arn:aws:iot:us-west-1:111222333444:topicfilter/trek10/*"
    }
  ]
}
The statements in this policy authorize a thing to do the following:
These are all basic actions a thing might need to interact with AWS IoT Core. Also, note that I am applying the Principle of Least Privilege to the things that make use of this policy. Something you should always consider when crafting access policies for AWS principles.
You can read more about the actions listed above at the following link.
https://docs.aws.amazon.com/iot/latest/developerguide/iot-policy-actions.html
The two main points to understand about this policy are that it expects things to connect with an MQTT client ID prefixed with “aws-trek10-thing-” and it allows a thing to interact with topics prefixed by “trek10/”.
Let’s now create our AWS IoT Policy using the following CLI command:
aws iot create-policy --policy-name "trek10-iot-policy-1" --policy-document file:///tmp/trek10-iot-policy-1.json
We’ll now create a certificate for our thing(s) to use when authenticating with AWS IoT Core. Execute the following command using the AWS CLI to accomplish this:
aws iot create-keys-and-certificate --set-as-active --certificate-pem-outfile trek10-cert.pem --public-key-outfile trek10-public-key.pem --private-key-outfile trek10-priv-key.pem
Make note of the “certificateArn” returned to the console. You will need this info in the steps that follow.
{
    "certificateArn": "arn:aws:iot:us-west-1:111222333444:cert/799e4bb543016edac06ba9fc06cdb9170be6bc1edb15c56608b5bb2e5d2aa9f9",
    "certificateId": "799e4bb543016edac06ba9fc06cdb9170be6bc1edb15c56608b5bb2e5d2aa9f9",
    "certificatePem": "-----BEGIN CERTIFICATE-----[TRUNCATED]
Also, make note of the “set-as-active” switch used in that command. Certificates must be activated for devices to make use of them.
We’ll also need the root Amazon Certificate Authority (CA) to make use of the certificate we just created. The Amazon CA1 certificate, the most often used Amazon CA version, can be found in the following repository.
https://www.amazontrust.com/repository/
Execute the following command to download this certificate.
curl -o AmazonRootCA1.pem
https://www.amazontrust.com/repository/AmazonRootCA1.pem
Store all of the generated and downloaded files somewhere safe and make note of the location. The certificate files we generated should be treated in a sensitive manner and protected in the same way you would a password or API key.
At this point, we’ll need to attach the IoT policy we created to the device certificate and then associate the certificate with our thing(s).
We’ll need to obtain the certificate ARN prior to doing this. Execute the following command to retrieve your certificate’s ARN if you didn’t make note of it during creation.
aws iot list-certificates
You should see something like the following returned on the console:
{
    "certificates": [
        {
            "certificateArn": "arn:aws:iot:us-west-1:111222333444:cert/f54e026bd11784c44fbe42d165ba168465a1b055aa9d113e3261f579c69aabaf",
            "certificateId": "f54e026bd11784c44fbe42d165ba168465a1b055aa9d113e3261f579c69aabaf",
            "status": "ACTIVE",
            "creationDate": "2022-11-16T17:14:40.902000+00:00"
        }
    ]
}
Execute the following AWS CLI command to attach the IoT policy to the certificate. Replace “CERT_ARN” with the certificate ARN we obtained above.
aws iot attach-principal-policy --principal CERT_ARN --policy-name trek10-iot-policy-1
Now execute the following AWS CLI command to associate the certificate with our previously created thing.
aws iot attach-thing-principal --thing-name trek10-thing-1 --principal CERT_ARN
We almost have what we need at this point to connect a thing to AWS IoT Core and allow it to publish and subscribe to message topics. We need one more piece of information in the form of the AWS IoT Core “data plane” endpoint. This endpoint is used to send and receive data to and from the Message Broker, Device Shadow, and Rules Engine components of AWS IoT.
Execute the following command to obtain the data plane endpoint in the region you are operating in.
aws iot describe-endpoint --endpoint-type iot:Data-ATS
You should see something like the following returned on the console.
{
    "endpointAddress": "a52tv5ff7ph83-ats.iot.us-west-1.amazonaws.com"
}
So with that, we now have all the prerequisites required to configure a thing to interact with AWS IoT Core. Let’s recap what the requirements are before moving on.
Next, we’ll simulate a thing using a Python script and look at some interactions a device might have with the IoT Core service. Download the “publish-to-iot-core.py” “subscribe-to-iot-core.py” scripts located in the following repository:
https://github.com/trek10inc/exploring-aws-iot-services
The publish script generates simulated sensor data for a weather station. It will produce JSON data similar to the following:
{
   "Scale": "c",
   "Temperature": 12.6,
   "Humidity": 100,
   "Timestamp": 1669044698,
   "Barometer": 28.26,
   "wind":{
      "Velocity": 31.76,
      "Bearing": 317.14
   },
   "Device": 3
}
You’ll need to install the “paho.mqtt” package before you can use either script. You can learn more about installing a Python package at the following link:
https://packaging.python.org/en/latest/tutorials/installing-packages/
I like using virtual environments to spare myself from enduring package collisions. The link above explains this but I’ll save you from having to actually read the documentation by giving you the following.
mkdir /tmp/iot-project-1
cd /tmp/iot-project-1
python3 -m venv .venv
source .venv/bin/activate
pip3 install paho.mqtt
wget https://link.to.repo/publish-to-iot-core.py
wget https://link.to.repo/subscribe-to-iot-core.py
These commands create an isolated virtual environment where you can run the two Python scripts I’ve created without interfering with your global Python environment. Ensure that your virtual environment is “activated” when executing these scripts.
Moving on…
Note the variables at the top of both Python scripts. These are what we’ll use to ensure our simulated thing can effectively communicate with IoT Core. These are the prerequisites previously noted.
The “topic” and “client_id_prefix” are important as we used them in the IoT policy we created above. You’ll need to adjust the path to your certificates, as well.
#---------------------------------------------------------------
# important settings
topic = "trek10/initial"
client_id_prefix = "aws-trek10-thing-"
broker = "d52tv5ab7ph83-ats.iot.us-west-1.amazonaws.com"
port = 8883

# certificate params
certificate = "/path/to/aws-certs/trek10-cert.pem"
private_key = "/path/to/aws-certs/trek10-priv-key.pem"
ca_bundle = "/path/to/aws-certs/AmazonRootCA1.pem"
#---------------------------------------------------------------
I hadn’t mentioned the port our thing utilizes when communicating with the AWS message broker. You can find specifics on the protocols, authentication, and port mappings made available by IoT Core at the following link:
https://docs.aws.amazon.com/iot/latest/developerguide/protocols.html
Now that we’ve got our scripts properly configured, let’s begin publishing messages to the “trek10/initial” topic. Execute the following command to continually loop and send messages to the AWS IoT Core message broker.
while true; do python3 publish-to-iot-core.py; sleep 3; done
You should see something like the following returned on the console:
Published message: {"scale": "c", "temperature": -1.72, "humidity": 57.02, "timestamp": 1668640088, "barometer": 31.68, "wind": {"velocity": 107.7, "bearing": 292.51}, "device": 1}
Connected with result code 0
Published message: {"scale": "c", "temperature": -1.73, "humidity": 57.77, "timestamp": 1668640090, "barometer": 31.52, "wind": {"velocity": 106.49, "bearing": 282.75}, "device": 1}
Connected with result code 0
Published message: {"scale": "f", "temperature": 120.14, "humidity": 40.64, "timestamp": 1668640093, "barometer": 29.67, "wind": {"velocity": 150.54, "bearing": 131.02}, "device": 2}
Jump over to the AWS web console and see if your transmitted messages were received by the “trek10/initial” topic.
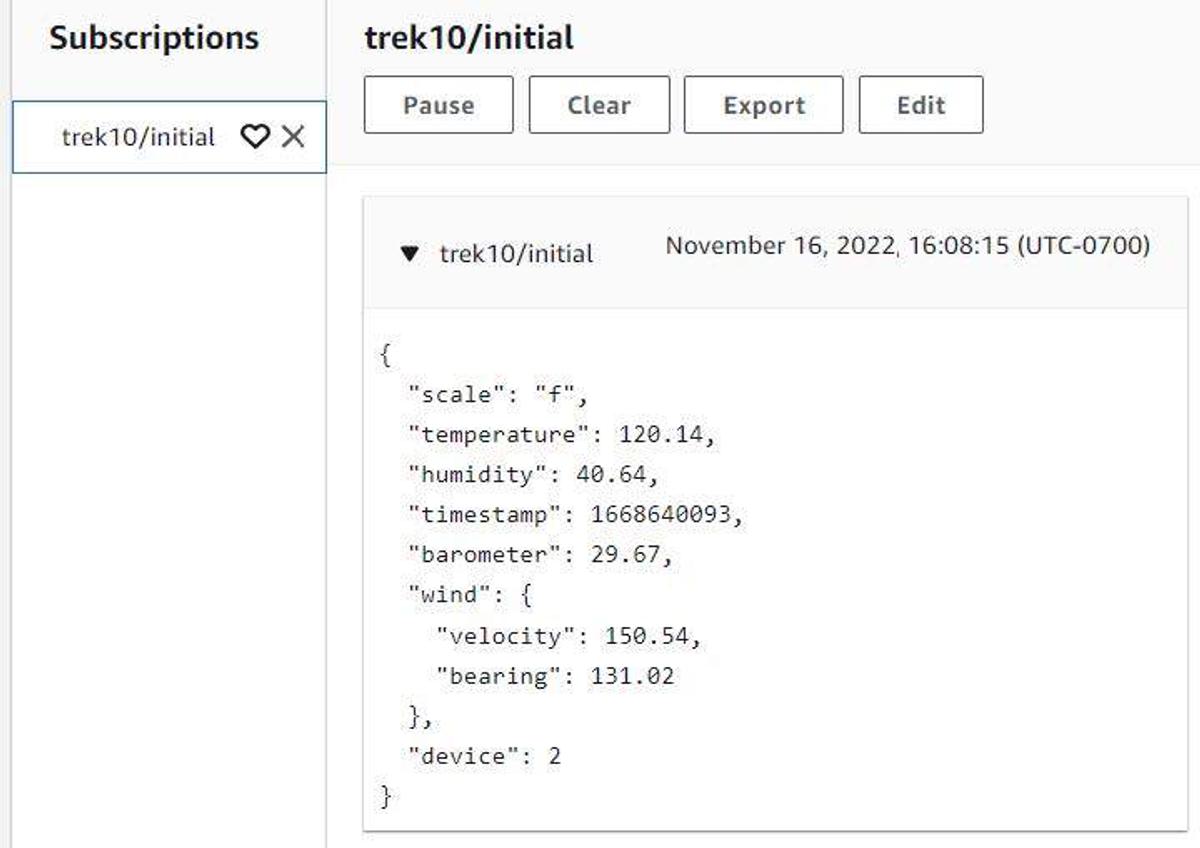
Looking good. Let’s now utilize the “subscribe-to-iot-core.py” script to perform the same subscription activity but from the vantage point of the thing we’re simulating. With the publish script still looping, execute the following command in another terminal to subscribe to the “trek10/initial” topic:
python3 ./subscribe-to-iot-core.py
You should see something like the following returned on the console:
Connected with result code 0
Connected with result code 0
Topic: trek10/initial
Received message: {"scale": "f", "temperature": 118.37, "humidity": 39.79, "timestamp": 1668640517, "barometer": 30.78, "wind": {"velocity": 143.64, "bearing": 131.61}, "device": 2}
Topic: trek10/initial
Received message: {"scale": "f", "temperature": 122, "humidity": 38.87, "timestamp": 1668640522, "barometer": 29.59, "wind": {"velocity": 144.14, "bearing": 132.53}, "device": 2}
Topic: trek10/initial
Received message: {"scale": "f", "temperature": 122, "humidity": 36.99, "timestamp": 1668640525, "barometer": 30.21, "wind": {"velocity": 147.81, "bearing": 128.0}, "device": 2}
Topic: trek10/initial
Received message: {"scale": "c", "temperature": -1.74, "humidity": 57.64, "timestamp": 1668640533, "barometer": 31.26, "wind": {"velocity": 109.65, "bearing": 294.93}, "device": 1}
Success! Our simulated thing was able to publish to and receive messages from our AWS IoT Core broker using certificate authentication.
At this point, we should have a good understanding of how IoT devices are connected to AWS IoT Core and interact with topics by publishing and/or subscribing to them. These basic capabilities are the critical first step in realizing the value of data generated by IoT devices via the use of AWS services.
In the next part of this blog series, we’ll look at how to leverage IoT Core rules to listen for specific messages, format message payloads, and send results to other AWS services.

Explore the Blues Cell + Wifi communication module on a Raspberry Pi Zero, Notehub, and thoughts on the pros and cons of utilizing Blues in your IoT project.